
Understanding the CloverDX Project Lifecycle

Data Integration pipelines, like all software systems, have a lifecycle that includes transitions between development, test and production environments. This article describes the lifecycle and related deployment model used to create and manage CloverDX Data Integration jobs.
CloverDX is designed to simplify managing data integration pipelines through all phases of their lifecycle. CloverDX offers:
- Ease of use – visually design and organize your projects
- Ease of collaboration – use any version control system to manage pipeline artifacts
- Ease to deployment and promotion - move projects between development, QA and production environments.
- Ease of management - prevent issues when porting to a different platform and simplify the deployment process. CloverDX jobs do not have to be compiled. Jobs run within CloverDX platform, not in a database or external engine.
The CloverDX Platform Architecture
CloverDX platform components
The CloverDX platform includes design, runtime and automation tools that operate on or with jobs designed in its ecosystem.
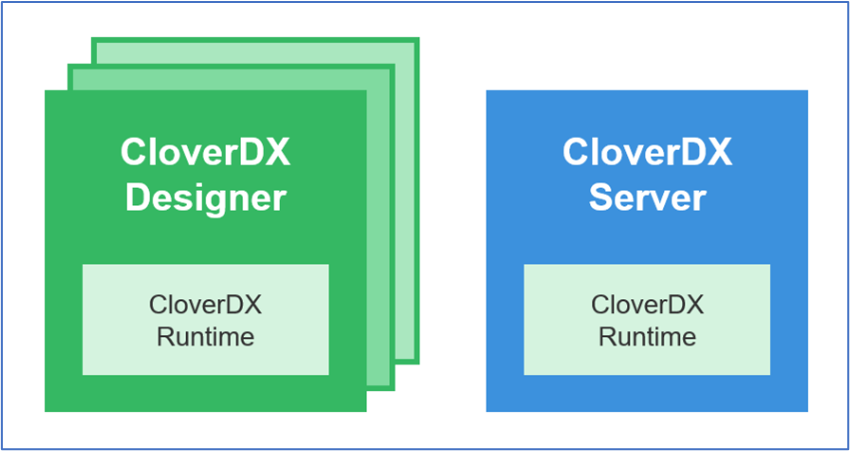
CloverDX Designer – visual development environment (IDE) used to create, test and manage pipeline files.
CloverDX Server – production environment that automates and monitors execution of data pipelines, creates and manages logs and dispatches alerts. Server, for short, allows to build fully autonomous data pipelines.
CloverDX Runtime – low-level execution environment that runs CloverDX jobs that you created in CloverDX Designer. It does not have any user interface and it is fully controlled by Designer or Server through its APIs. The same CloverDX runtime is embedded within both CloverDX Designer and CloverDX Server ensuring that jobs run the same in both environments.
CloverDX Pipeline Project files
CloverDX organizes all resources for related data pipelines into a CloverDX project. A CloverDX Project is a directory that follows pre-defined conventions for where different file types are located. It typically contains and organizes all pipelines related to a certain use case (or multiple use cases) and their dependencies (like data layouts, parameters and more).
Project files are typically XML documents or property files. These files are all created and edited in CloverDX Designer, managed in production by a CloverDX Server, and used during execution by the CloverDX Runtime.
| File type | Extension | Format | Purpose |
|---|---|---|---|
| Graph | .grf | XML | Defines record level data processing. |
| Subgraph | .sgrf | XML | Encapsulates and makes reusable collections of graph components. |
| Jobflow | .jbf | XML | Defines pipeline orchestration (a workflow), often executing graphs, subgraphs and other jobflows in some prescribed order tracking dependencies, handling errors and more. Jobflow files can only executed on a CloverDX Sever. |
| Data Service | .rjob | XML | Defines HTTP API endpoints published on CloverDX Server. These endpoints can use graphs, subgraphs or jobflows to implement their functionality. |
| Metadata | .fmt | XML | Defines layouts and additional properties of source, target and intermediate data structures. Information includes field names, types and formats and more. |
| Connection | .cfg | Text | Contains connection information for data sources and targets (e.g. username, password, host, port, database name). |
| Parameter | .prm | XML | Contains user-manageable parameters that can be used to change behavior of any job or component. |
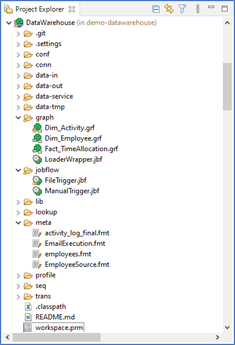
CloverDX Designer includes a Project Explorer view that provides hierarchical access to all the files within a project.
Developing CloverDX Projects
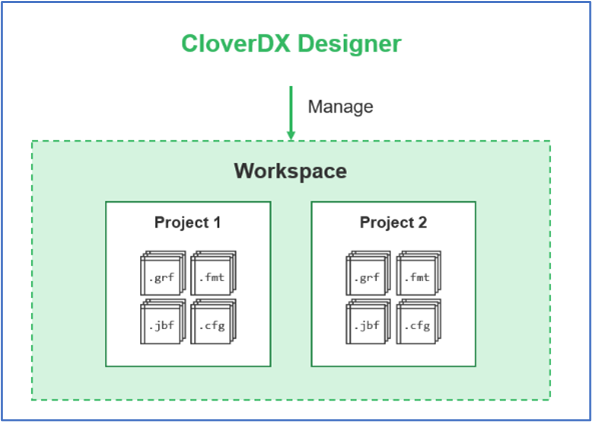
A CloverDX Project begins its life in CloverDX Designer. CloverDX is based on Eclipse IDE platform and uses the concept of a workspace to contain one or more projects with common settings (e.g. tabs vs. spaces, color and font settings for interface, general tool layout, ...). For CloverDX though, the workspace and its referenced projects are simply a hierarchy of directories on disk. As CloverDX jobs are designed, related files are created, edited and stored in this directory structure.
CloverDX Projects can be developed “offline” in the Designer only or the Designer can connect to the Server to directly manage the projects there.
Deploying Projects to CloverDX Server
Once a project has reached a certain level of maturity it is typically deployed to a CloverDX Server where it can run automatically, and where orchestration and automation features can be exercised. There are several ways to deploy a project to CloverDX Server.
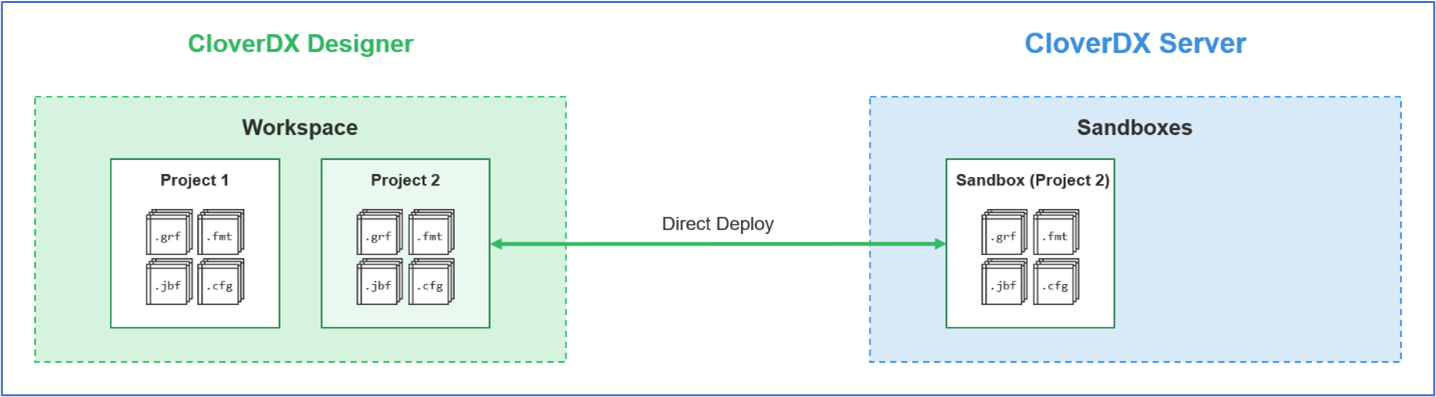
Deploying a project directly from CloverDX Designer
The simplest mechanism for deploying a project to server is to do it directly from within CloverDX Designer. Designer contains controls that allow deployment of any project to any accessible Server. To do this, CloverDX Designer will establish an HTTP (or HTTPS) connection to CloverDX Server and copy project files from the Designer workspace to a Server sandbox.
A sandbox is essentially CloverDX Server’s equivalent of a project – it is a directory on the Server that contains job files along with additional properties for UAC, logging, parallelization settings and more.
When deployment is complete, we say that the sandbox and project are connected and a bidirectional synchronization is set-up between the two. Changes made to project files in either Server or Designer will automatically be reflected in the other environment. Designer typically initiates synchronization process on:
- Opening a project
- Manual refresh
- End of job execution
- Project structure manipulation (save, move, create/delete folder, ...)
Deploying a project with CloverDX Export/Import GUIs
Designer includes an import/export feature which allows the import/export of individual files or entire projects to disk as a zip archive or as a set of files. Likewise, Server contains this same import/export feature. Files can be explicitly exported from one environment and imported into the other using these Designer and Server GUIs.

Deploying a project with Server’s HTTP API
CloverDX Server provides a public web API that allows the creation of sandboxes and the upload/download of files into those sandboxes. The documentation for this API is available on any installed instance of CloverDX Server at
http://[host]:[port]/clover/api/rest/[api-version]/docs.htmlThis API can also be used in arbitrary scripts, or in continuous integration tools like Jenkins to deploy projects to a Server.
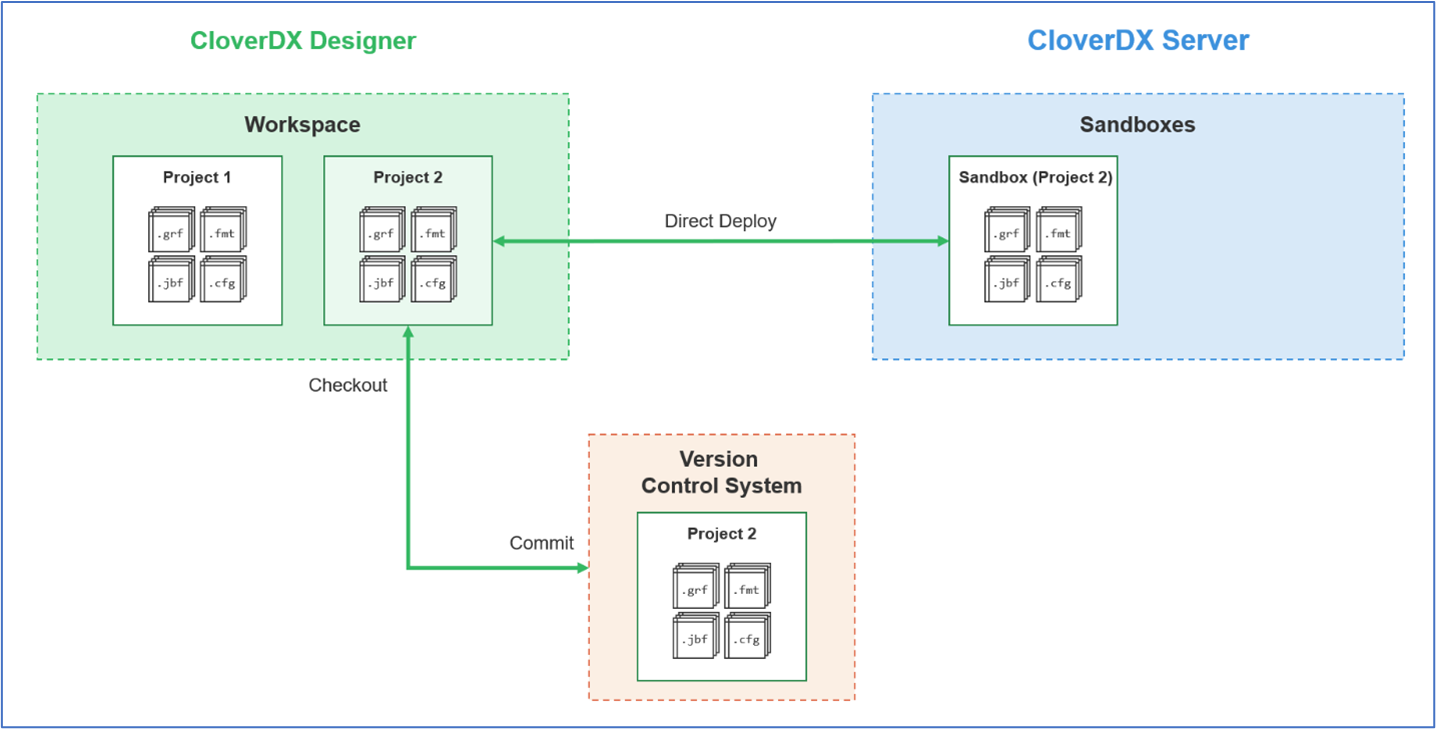
Managing Projects with Version Control
CloverDX projects can be managed with any common version control system. Because all files are plain text (XML or property files), they are ideally suited to be versioned, compared, reverted and merged. CloverDX Designer ships with a built-in connector for Git. Plugins are also available in the Eclipse Marketplace for other version control systems such as SVN or Microsoft’s Team Foundation Version Control. Developers accustomed to working with their Version Control Systems via a command line interface can easily open a shell, navigate to their Designer workspace on disk and issue commands from there.
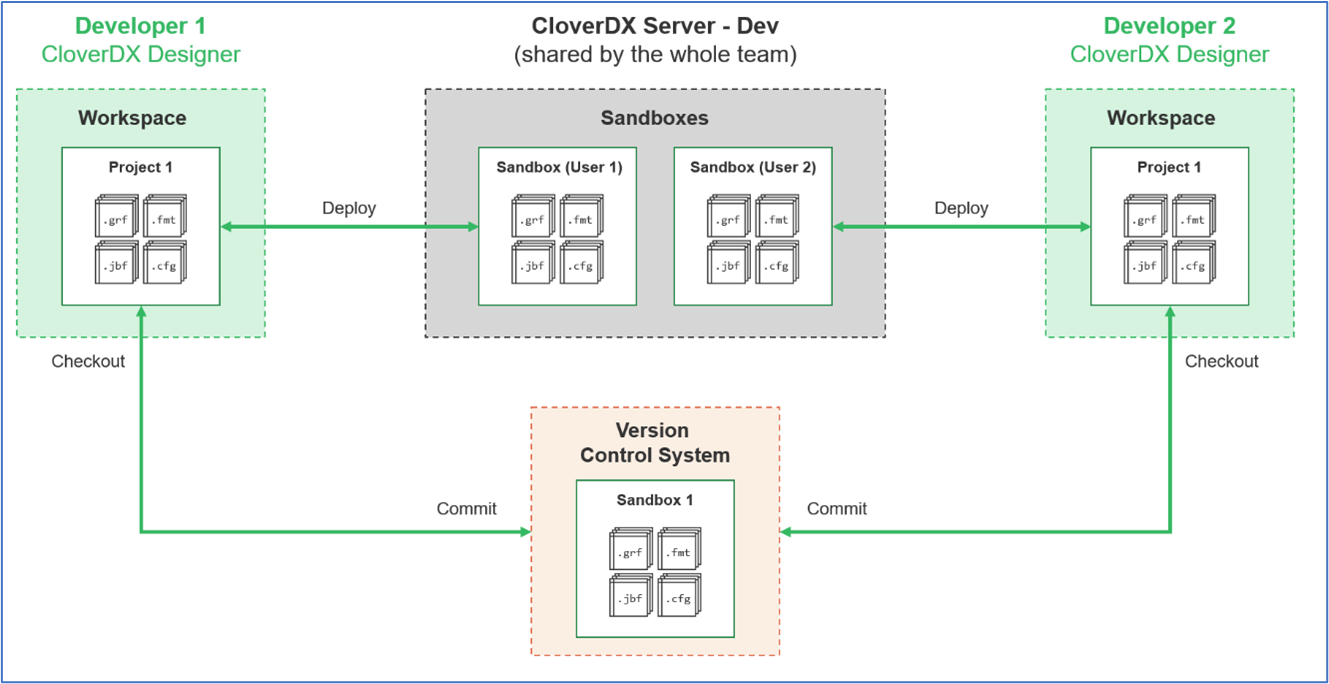
Best practices for Team Development and Collaboration in CloverDX
Complex projects created by teams of developers can be managed and deployed effectively using version control and multiple sandboxes using a process like this:
- Each member of the development team checks out the project from Version Control, creating separate branches if project or task complexity dictates.
- Each member deploys their version of the project to a personal sandbox on the test server.
- Each team members commits their changes to the repository in the appropriate branch.
- When a team member wants to “pick up” changes from other team members, they pull them into their Designer workspace from the repository, merging branches as necessary. From there, changes are automatically synchronized to their Server sandbox. If external tool is used, make sure to refresh project in CloverDX Designer manually to initiate synchronization process.
- Changes are committed into separate branches as needed and merged depending on the workflow as needed. That way each developer gets a clean place to work while also making sure that changes are not lost.
The flexibility of the above deployment method allows each team to set their own processes with regards to branch creation, management, code reviews and more. Larger teams typically need a bit more formalized processes while small teams (or lone developers) can rely on a simple and quick deployment model to minimize the overhead.
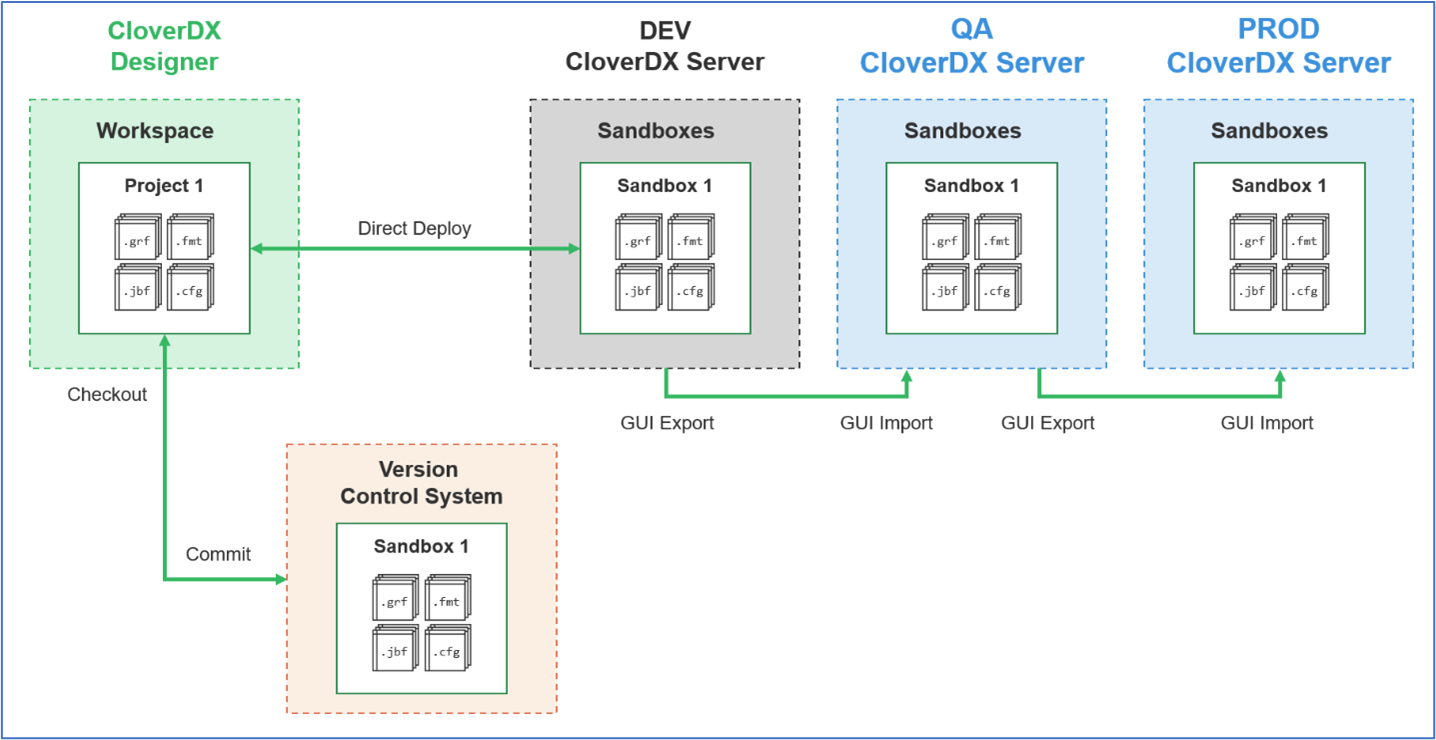
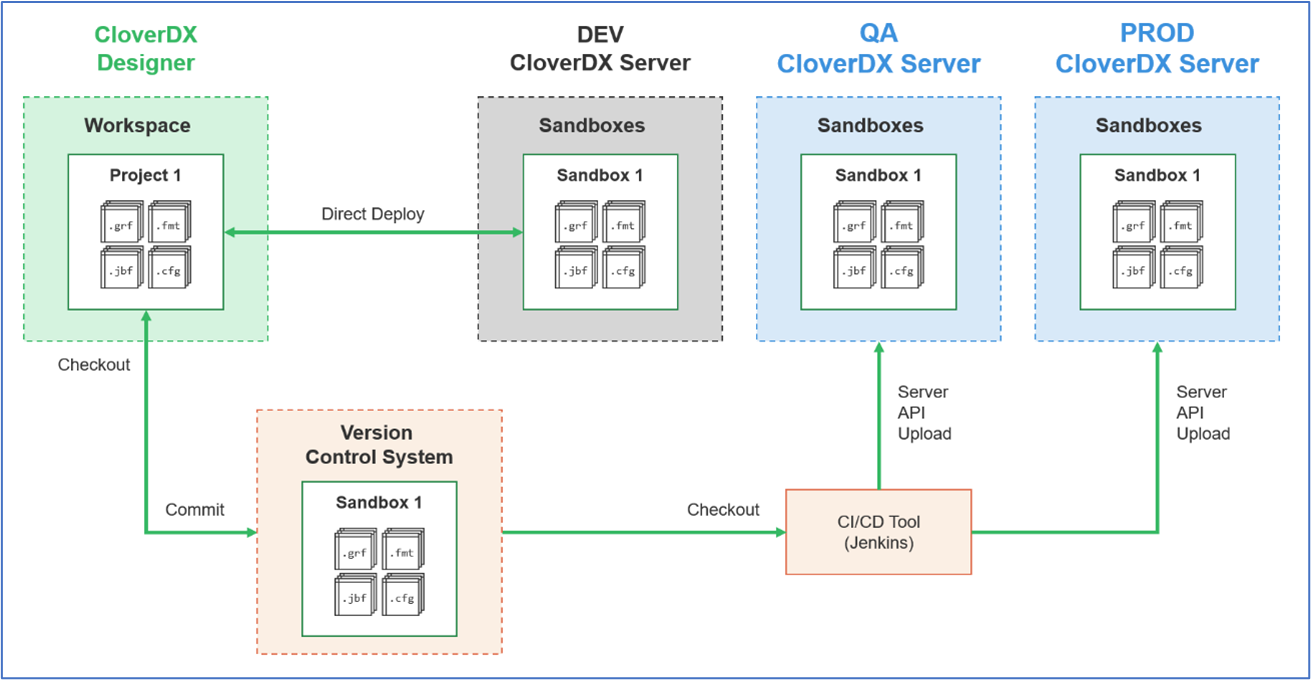
Moving from Development to QA to Production
The approach described above is all that is needed to promote code between multiple different environments – e.g., going from Dev to QA and then to Prod.
The general approach would be:
- Each developer works as described above – using their own sandboxes, branches etc.
- When developers finish their tasks, they push the code and merge into one branch. Depending on the process in each team, this can be master branch or in large projects a “release” branch etc.
- When all code is merged and properly reviewed, this branch can be pulled onto a QA server. This deployment to QA can be done with any of the methods described above (direct connection from designer, via the CloverDX import/export GUIs, or via Continuous Integration scripts that use version control and the server APIs).
- QA tests everything on this sandbox. Any issues are reported back and fixed in the branch after which new version is pulled to the Server.
- Once testing is done and everything is ok and approved, the same branch can be pulled onto the production environment.
The CloverDX Platform with its text-based project artifacts, Designer based on Eclipse IDE with built-in version control support, and Server APIs, it supports a project lifecycle that is ideally suited to enable your teams effectively develop, collaborate, test and operate all your data pipelines.
More from Tech Blog
-
CloverDX Server diagnostics with ChatGPT or Claude via MCP
Administrating a healthy CloverDX Server usually means correlating information scattered across performance logs, job tracking tables, execution logs,... AI -
Data Quality Examples on GitHub
As our first set of examples, we published a project called DataQualityExamples which demonstrates how users can address their data quality issues with... CloverDX How-To -
Introducing CloverDX Examples on GitHub
We’re excited to introduce the CloverDX Examples repository on GitHub. The repository is a growing collection of helpful and practical examples designed to... CloverDX How-To -
Sending emails via Azure Communication Services SMTP
There are many situations where it is helpful to get a message from your active pipelines. These may include logs, summaries of successful completion, or... Cloud -
Connecting to REST APIs (OpenAPI)
Connecting to REST APIs is a crucial aspect of modern data integration, and the REST Connector in CloverDX provides a streamlined approach. The video below... RESTConnector -
Performance tuning: How to troubleshoot database-related performance issues in CloverDX
Performance is undoubtedly one of the key factors when running data transformations. In this article, we will look at how to troubleshoot database-related... Performance
Visit CloverDX Blog
-
How financial services firms use automation to cut reporting from days to half a day
-
Data integration after an acquisition: How fast-growing companies stay in control
-
Boomi vs CloverDX for enterprise data integration
-
Boomi Alternatives: A Complete Guide (2026)
-
Why SaaS engineers are stuck doing manual customer data onboarding – and how to fix it