
CloverDX in a Kubernetes Pod using Google Kubernetes Engine (GKE)
Containerized deployments have become increasingly popular amongst our clients. We here at CloverDX maintain a Docker image for developers to use throughout their organizations. By leveraging our Docker repo along with a container management system (like Kubernetes) you gain the ability to easily spin up new instances of CloverDX Server and scale them as needed.
In this tutorial, we're going deploy several Docker containers within a Kubernetes pod on Google Cloud Platform using Google Kubernetes Engine (GKE).
What we need:
- Google Cloud Platform Account (Trial or Production)
- CloverDX Server License
- CloverDX Server .WAR File
- CloverDX Docker Image (https://github.com/cloverdx/cloverdx-server-docker)
Getting License and software files
If you haven’t already done so, create a trial account for CloverDX. Log in using your CloverCARE credentials sent to your email. The log-in page can be found here: https://support.cloverdx.com
Once you're logged in, go to the "Downloads and Licenses" section using the button on the top bar.

- Download the “Tomcat Server Download” link. You should see a "clover.war" file pop up in your downloads
- On the right side, you should see a "CloverDX Server License".
-
- Click to open a text file showing license information.
- Click the button that says “Copy to Clipboard”.
- Go to any text editor (like Notepad++), make a new file.
- Paste the license information over from your clipboard.
- Finally, save this new file as "license.dat".
Now we have everything we need to start working GCP!
Google Cloud Project creation
After logging into your Google Cloud Project create new Google Cloud Project with a name of your choice.
- Click on the project tab in the top left to open up the projects menu
- Select “New Project” in the top right of the menu

- Name your project as you'd like. We went with "cloverdx" for our example project
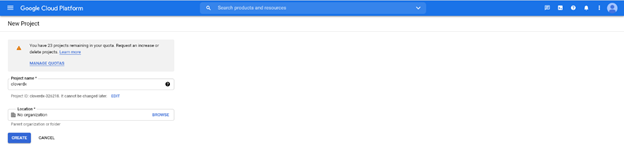
- Click "Create" to finish making your new project
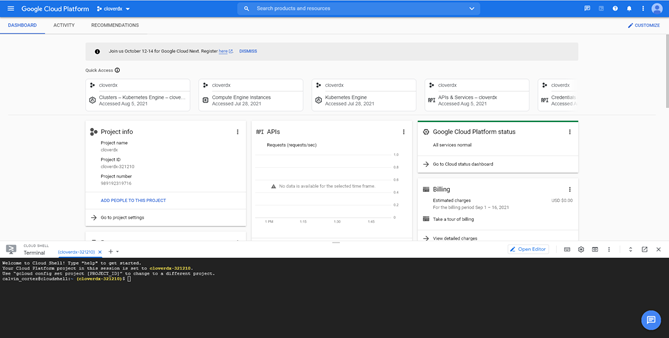
Navigate to your new project in the Google Cloud Console.
- Click on the Activate Cloud Shell button in the top right corner of the Cloud Console

- A Cloud Shell session opens inside a new frame at the bottom of the Cloud Console and displays a command-line prompt.
Create Docker Repository in GCP
- Set the
PROJECT_IDenvironment variable to yourGoogle Cloud project ID(PROJECT_ID). You'll use this environment variable when you build the container image and push it to your repository.export PROJECT_ID=<created project id> // e.g. cloverdx-123456
export REGION=<target region> // e.g. europe-west3 echo $PROJECT_ID $REGION - Set your project ID for the gcloud command-line tool:
gcloud config set project $PROJECT_ID
Output:Updated property [core/project].
Note: Your gcloud tool might already be set to your$PROJECT_ID—you will still see the Updated property output. - Create the hello-repo repository with the following command:
Replace REGION with the a region for the repository, such as us-west1. To see a list of available locations, run the command:gcloud artifacts repositories create hello-repo \ --repository-format=docker \ --location=$REGION \ --description="Docker repository"
Setting up and Building our Container Image
- We need to pull our base Docker image into our GCP Machine and make some modifications to get up and running. From Google Cloud Shell:
git clone https://github.com/cloverdx/cloverdx-server-docker.git - Now we need to upload the
clover.warandlicense.datfiles we got in previous steps into ourcloverdx-server-dockerdirectory- In the google console, go into your cloverdx-server-docker directory:
cd cloverdx-server-docker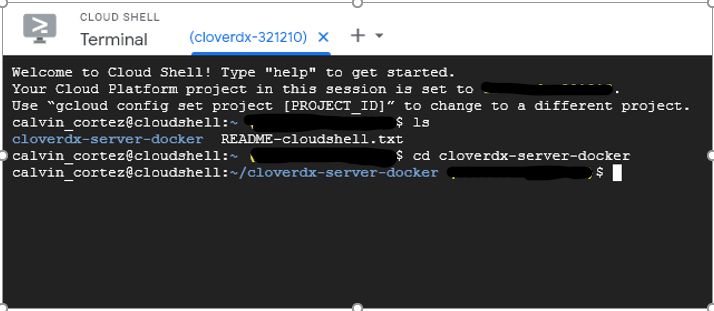
- Now we need to upload our .war file using Google’s cloud console. On the right side, click the "…" button to open up more options and choose "Upload a File"

- Navigate to local directory where you downloaded
clover.warand upload it. - Once you get a successful upload message, run the list files command:
lsand confirm that you seeclover.warin the current directory.
- Now let’s do the same and upload our saved
license.datfile. Move it into the examples/Kubernetes directory:cd examples/kubernetes
- Now upload the
license.datfile from your local computer to the shell cloud console using the same process as before. - Once you get a successful upload message, run the list files command:
ls - Confirm that you see
license.datin the current directory.
- In the google console, go into your cloverdx-server-docker directory:
Making a gcloud Kubernetes cluster
- Running the command:
gcloud container clusters create hello-cluster --num-nodes=1 --region=$REGION
Will make a gcloud Kubernetes cluster calledhello-clusterin$REGION(we set this variable in very first step in gcloud console) availability zone. It should take a few minutes of provisioning and then you should get a confirmation of it running that looks like this:
- Now, when infrastructure is ready, we need to deploy our Kubernetes example on this cluster.
- We need to grab credentials (switch console context to environment we want to deploy) from our Kubernetes cluster by running:
gcloud container clusters get-credentials --region $REGION hello-cluster - Next, we need to run a command to initiate the launch of our Kubernetes instance.
./run.sh eu.gcr.io/$PROJECT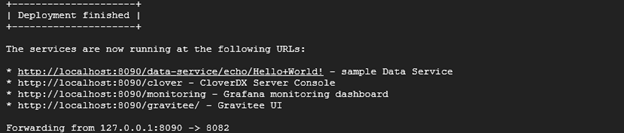
This application will now be forwarding traffic through port 8082. Press ctrl+c to exit out of the forwarding script running.
- We need to grab credentials (switch console context to environment we want to deploy) from our Kubernetes cluster by running:
- All services (pods) created using CloverDX public example register themselves in a namespace
cloverdx.
Adding a Load Balancer
To be able to access instance from the internet, you need to create load balancer which will proxy incoming traffic into your CloverDX GKS cluster.
Example project published on Github uses Gravitee Gateway to distribute HTTP calls to multiple applications and is set up to route traffic coming to port 8082. To route external calls coming from HTTP port (80) to exposed one (8082), run:kubectl expose deployment gravitee-gateway --name=internet-lb --type=LoadBalancer --port 80 --target-port 8082 --namespace=cloverdx
Accessing our CloverDX Server Instance
- Now we need to look for the IP address so we can publicly access our cluster from a browser.
kubectl get service --namespace=cloverdx | grep internet-lb
Note: it may take a while till load balancer receives an IP address. When IP address is still pending assignment, you'll see<pending>instead of an IP address. It usually takes just couple of seconds. - In the fourth column, you should see an IP address. Copy and paste this into your browser. You should be able to access CloverDX Server console on http://<IP address>/clover.
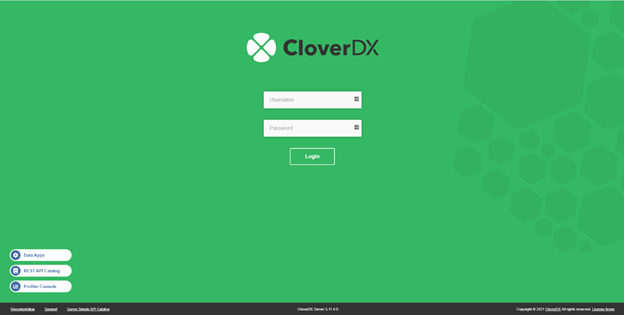
- To login, use the default credentials that come with every evaluation instance
Username: clover
Password: clover
We have now successfully provisioned and accessed our CloverDX Server instance running in a Kubernetes Pod on Google Cloud Platform. Be mindful about the fact, this is in no way production-grade deployment but rather an example of how to deploy CloverDX Server (or Cluster) in K8s.
To Shut down your Kubernetes Pod:kubectl delete --all pods --namespace=cloverdx. To completely remove all resources created by this tutorial. You also need to remove K8s cluster and container repository!
More from Tech Blog
-
CloverDX Server diagnostics with ChatGPT or Claude via MCP
Administrating a healthy CloverDX Server usually means correlating information scattered across performance logs, job tracking tables, execution logs,... AI -
Data Quality Examples on GitHub
As our first set of examples, we published a project called DataQualityExamples which demonstrates how users can address their data quality issues with... CloverDX How-To -
Introducing CloverDX Examples on GitHub
We’re excited to introduce the CloverDX Examples repository on GitHub. The repository is a growing collection of helpful and practical examples designed to... CloverDX How-To -
Sending emails via Azure Communication Services SMTP
There are many situations where it is helpful to get a message from your active pipelines. These may include logs, summaries of successful completion, or... Cloud -
Connecting to REST APIs (OpenAPI)
Connecting to REST APIs is a crucial aspect of modern data integration, and the REST Connector in CloverDX provides a streamlined approach. The video below... RESTConnector -
Performance tuning: How to troubleshoot database-related performance issues in CloverDX
Performance is undoubtedly one of the key factors when running data transformations. In this article, we will look at how to troubleshoot database-related... Performance
Visit CloverDX Blog
-
Data integration after an acquisition: How fast-growing companies stay in control
-
Boomi vs CloverDX for enterprise data integration
-
Boomi Alternatives: A Complete Guide (2026)
-
Why SaaS engineers are stuck doing manual customer data onboarding – and how to fix it
-
Legacy ERP. Hundreds of suppliers. Dozens of different data formats. How one distributor made it all work.