
Metadata Propagation: It Makes Your Data Integration Jobs Much Easier
In the CloverDX 4.0, along with subgraphs, we've introduced another very interesting feature: metadata propagation, that will make your data integration jobs much easier to prepare. Previously, you needed to assign metadata manually to every edge. In case you changed metadata in a graph, you would have to manually re-assign new metadata to each edge afterwards.

However now, once you insert metadata on an edge, CloverDX will try to push it from left to right, and then from right to left, filling in each edge with the metadata where it expects it will fit, significantly reducing the need for metadata management. Also, in case you change metadata somewhere in the graph, the metadata everywhere else in the graph will adjust automatically to reflect these changes.
What does this mean for you?
A whole lot of time saved that you would otherwise spend placing metadata on edges. CloverDX 4.0 now will do this for you the majority of time. Also, this function reduces room for error when assigning metadata in a graph, plus makes changes in complex graphs much easier, as you really only have to change one important edge and the rest will be propagated automatically. And last but not least, it works as a fail-safe, making sure you will get the output with the expected metadata at the end of the graph.
Also in CloverDX 4.0, metadata can be embedded in components or in subgraphs, which means that many times the metadata will come pre-made for you, either from a component, or from a previously-built subgraph. And in these cases, CloverDX will take the metadata and propagate them through the rest of the graph.
When CloverDX propagates metadata, a yellow pop-up will blink on the screen to show you where the metadata will be assigned. Automatically assigned metadata are shown with a dashed grey line. Of course, there is always the option of assigning metadata for any particular edge yourself. These manually-assigned metadata are represented by solid line and will always have priority over automated metadata.
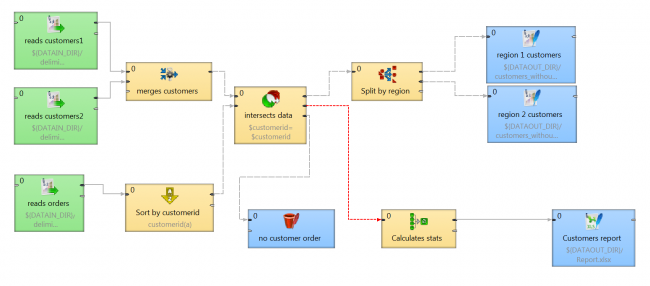
Different types of metadata propagation. Edge with manually-assigned metadata (solid line), edge with no metadata (red line) and edge with automatic metadata assigned (grey long dashes line).
Metadata propagation types
There are basically four types of metadata propagation. The first three are automatic; they assign metadata based on the components used, the type of graph, and the type of data. The last one – explicit metadata propagation - is semi-automated, as it is driven by user action when a user specifies metadata by selecting a reference edge. As a result, this edge will always have the same metadata as the referenced edge.
Metadata propagation and subgraphs
Where the metadata really shines is with subgraphs. When you create a subgraph, you can choose metadata that is required for the input or output (or even for both), so a subgraph will already have metadata embedded inside of it. This is especially handy when you are preparing customized connectors for CloverDX that will tap into your data and you are able to prescribe what kind of metadata will be produced by the connector. When you connect your subgraph to other components, this metadata will then automatically propagate throughout your graph. And when another user works with that subgraph, they won’t need to figure out and prepare the metadata for other components around it – the metadata will simply be there, automatically propagated throughout the graph.
Another very cool and clever way you can use subgraphs is as a template for your metadata (i.e. as a data target or a data source). You can create a customized component that contains a metadata template, which can be wrapped up for frequent reuse in any of your projects. And after adding this component into a graph, these metadata are propagated throughout the graph.
So, for instance, let’s say you have a specific format for Excel that needs to be written at the end of many of your graphs, with specific settings encoded in it. A savvy solution would be to wrap up that SpreadsheetDataWriter as a subgraph, and then configure it so that it insists on a specific format of metadata as its input. This SpreadsheetDataWriter subgraph would then create a unified end-product, across all projects, so that that all users and team members won’t have to worry about using the wrong format.

As you can see, subgraph is the source of metadata for the whole graph.
Using manually assigned metadata
Although in the majority of graphs, using automatically propagated metadata is a great time saver and preferable, there are times when we suggest using manually assigned metadata. This is true for longer data transformations that require a strictly defined output (for instance: you agreed on a specific format of an Excel sheet as the end product of a data transformation). In these situations, it is advisable to manually set the metadata for the graph’s last edge. Even though metadata propagation predicts and spreads your metadata throughout your transformation, you’ll still want to be completely sure that the metadata has propagated exactly as needed (in case someone made some change to a subgraph that alters the metadata, without your knowledge).
This is only a basic introduction to metadata. In the future, we will bring you other blogs and videos that will explain metadata propagation more deeply with examples and use cases.
If you'd like to see more about metadata propagation in action, check out our video here:
More from Tech Blog
-
CloverDX Server diagnostics with ChatGPT or Claude via MCP
Administrating a healthy CloverDX Server usually means correlating information scattered across performance logs, job tracking tables, execution logs,... AI -
Data Quality Examples on GitHub
As our first set of examples, we published a project called DataQualityExamples which demonstrates how users can address their data quality issues with... CloverDX How-To -
Introducing CloverDX Examples on GitHub
We’re excited to introduce the CloverDX Examples repository on GitHub. The repository is a growing collection of helpful and practical examples designed to... CloverDX How-To -
Sending emails via Azure Communication Services SMTP
There are many situations where it is helpful to get a message from your active pipelines. These may include logs, summaries of successful completion, or... Cloud -
Connecting to REST APIs (OpenAPI)
Connecting to REST APIs is a crucial aspect of modern data integration, and the REST Connector in CloverDX provides a streamlined approach. The video below... RESTConnector -
Performance tuning: How to troubleshoot database-related performance issues in CloverDX
Performance is undoubtedly one of the key factors when running data transformations. In this article, we will look at how to troubleshoot database-related... Performance
Visit CloverDX Blog
-
Boomi vs CloverDX for enterprise data integration
-
Boomi Alternatives: A Complete Guide (2026)
-
Why SaaS engineers are stuck doing manual customer data onboarding – and how to fix it
-
Legacy ERP. Hundreds of suppliers. Dozens of different data formats. How one distributor made it all work.
-
Beyond rules: How AI is transforming data classification, anonymization, and anomaly detection