
Building custom REST APIs for ETL processes

HTTP APIs currently drive data integration space. No matter which system enterprises use, most of them these days do support some way to extract or modify their internal data using interfaces. But what if, data integration software itself should provide data using similar interfaces, maybe to be able to augment native functionality of source system? In CloverDX, these programmable interfaces are called Data Services.
Data Services is a feature, allowing you to consume or publish data into or out of CloverDX Data Management platform. It allows you to quickly expose a data pipeline (with or without transformations) in the form of a REST API. This can all be done with CloverDX Designer and does not require extensive knowledge of HTTP, JavaScript, C#, etc. This greatly helps reduce the effort and shorten timelines for creating or connecting to API’s in your organization.
In this article, we’re going to go through journey of conversion existing job to make it HTTP context-aware so it can be either consumed by external application via an API call, or directly by a person who’d just to plug YouTube channel performance data to his favorite reporting tool like Microsoft PowerBI, on-demand.
Data Services support GET, POST, PUT, PATCH and DELETE calls. This allows for simplified data management using an ETL process powered by synchronous REST API call. The logic of the service is implemented using a CloverDX ETL job with full access to HTTP context of the REST call: incoming data, request parameters and headers. Service can respond with data, response HTTP headers and status codes. All of this is in direct control of the service developer.
Existing batch data job introduction
Even though, we could start from scratch, for brevity of this article; we take existing job which previously ran daily via schedule, delivering YouTube channel performance reports in form of a CSV/Excel report as an email attachment.
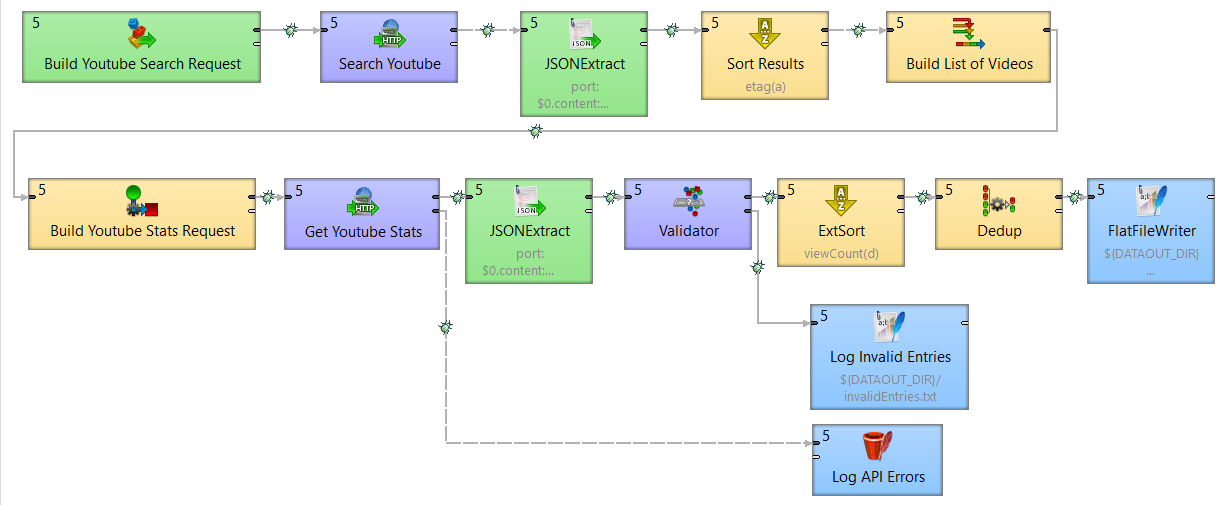
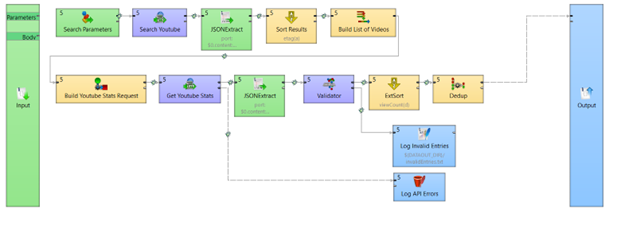
To briefly introduce what is going on here. We start with a query to the YouTube API endpoint (The purple “Search YouTube” box) to get the top results for a search string. We then send a second API request to the YouTube analytics API to gather the statistics of the video such as the number of views, thumbs up/down, number of comments, etc. Next, we are doing a bit of validation to ensure we remove videos we’re not interested in (the Validator component filters out videos in any other than English language in this case). Finally, we are sorting on the view count, keeping only the top results. Results are then written to a flat file.
Conversion to REST job
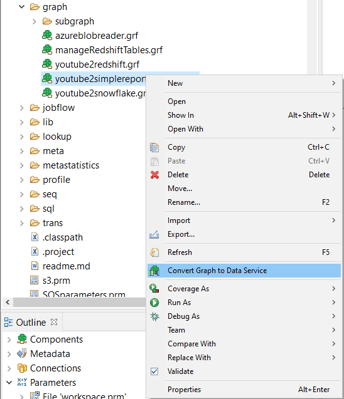
To make this job HTTP context-aware (i.e., convert to Data Service), we will simply right click the graph we would like to convert and select Convert graph to data service.
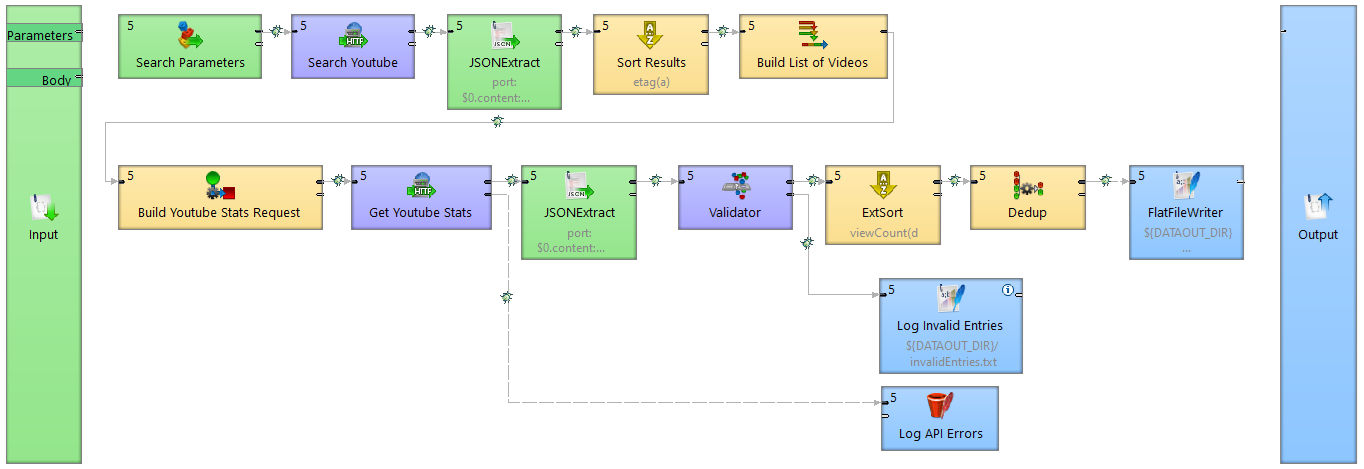
This will automatically create new Data Service job using original graph. The most noticeable difference is, canvas has a pillar to the left (HTTP input – parameters and request body) and one to the right (HTTP output – response body) with all our original components in the middle.
Most HTTP requests would have parameters. Parameter is any value, service consumers might want to change at the time of web service call.

In our example, the graph already had two parameters: QUERYSTRING and RESULT_COUNT. We will want the Data Service to accept these and pass into the graph.
In Data Service world, there are two types of parameters – job parameters (those of an ETL job) and request parameters (provided by HTTP call). These two are completely independent on each other. It sometimes happens, original job has some parameters configured (as in our case). Before you proceed, make sure you have no job parameters (in outline labelled just as "Parameters") set as required. This may sometimes lead to strange behavior where Data Service fails because of missing value for required parameter even when it is provided via HTTP request; request parameter is but job parameter is not. This brings us to another gotcha. Having Data Service parameters and job parameters with same names have undefined behavior! Otherwise, request parameters can be used just as job parameters. Hence the undefined behavior for overloaded names.
Parametrize a REST job
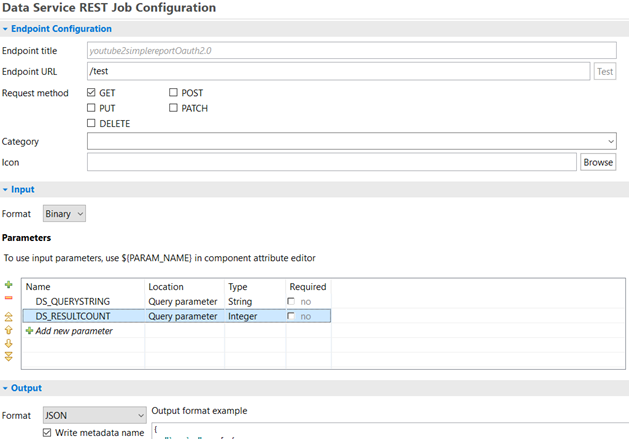
At the bottom left of the graph view, click on Endpoint Configuration tab. From here, we can add request parameters under the Input section as seen below. I gave them new names to make more obvious what would change in other parts of the solution - original ones are just, prefixed by DS_.
Another option would be to remove original job parameters altogether and create request parameters with same names. Then, no other changes to original solution would have to be made. Sometimes this is not possible, typically when dealing with external parameters. We’re taking the longer route here just because I want to demonstrate how to overcome this situation.
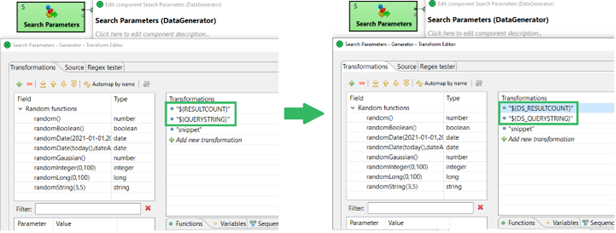
Original job parameters are being used in the first component, Search Parameters. We will replace the existing ones with the new request parameters – effectively rendering existing graph parameters unused. Alternatively, we could change graph parameter defaults. Instead of using QUERYSTRING="value", we’d have QUERYSTRING="${DS_QUERYSTRING}". This approach usually provides best convenience to non-breaking change ratio.
Moreover, it is more common to have HTTP parameters in lowercase. Choosing this approach sometimes leads to more tangible solutions as lowercase variable notation is in direct contradiction to CloverDX parameter naming best practices. They state, one should use uppercase parameters as they are easier to visually spot in a code (= treat them as programming constants).
Final touches
Finally, we reconnect output from the logic from FlatFileWriter to right-side (Output) pillar. FlatFileWriter can be removed afterwards. Resulting in a job looking like the one below.
We can then go back into the Endpoint configuration tab and click test. Your browser should open the endpoint so you can run queries based on defined request parameters. Test page will make a call and displays results of the query.
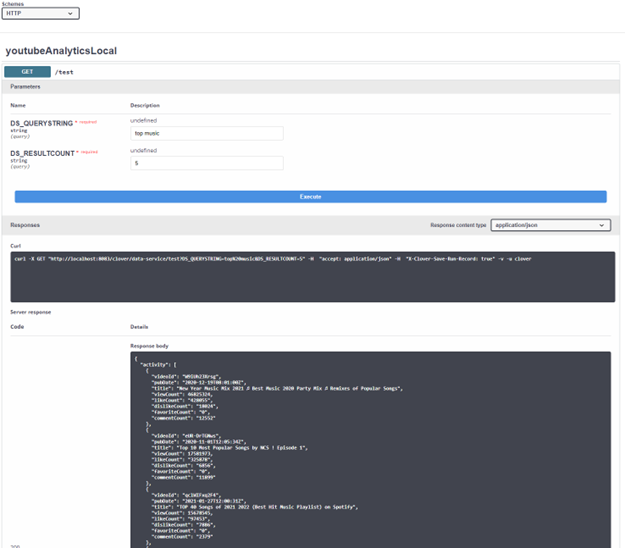
When we're satisfied with Data Service responses, in Endpoint configuration, we simply click publish which will make it publicly available on the server for users with appropriate permissions. Additional properties (like security and monitoring) can be set in CloverDX Server Console, under Data Services module.
Summary
We've covered basics of how to jump-start Data Service development from existing job. This knowledge should help you build API endpoints for your various graphs but it only scratches the surface of what CloverDX can do. Please browse our wiki for additional information or feel free to reach out to us if additional help is needed.
More from Tech Blog
-
CloverDX Server diagnostics with ChatGPT or Claude via MCP
Administrating a healthy CloverDX Server usually means correlating information scattered across performance logs, job tracking tables, execution logs,... AI -
Data Quality Examples on GitHub
As our first set of examples, we published a project called DataQualityExamples which demonstrates how users can address their data quality issues with... CloverDX How-To -
Introducing CloverDX Examples on GitHub
We’re excited to introduce the CloverDX Examples repository on GitHub. The repository is a growing collection of helpful and practical examples designed to... CloverDX How-To -
Sending emails via Azure Communication Services SMTP
There are many situations where it is helpful to get a message from your active pipelines. These may include logs, summaries of successful completion, or... Cloud -
Connecting to REST APIs (OpenAPI)
Connecting to REST APIs is a crucial aspect of modern data integration, and the REST Connector in CloverDX provides a streamlined approach. The video below... RESTConnector -
Performance tuning: How to troubleshoot database-related performance issues in CloverDX
Performance is undoubtedly one of the key factors when running data transformations. In this article, we will look at how to troubleshoot database-related... Performance
Visit CloverDX Blog
-
How financial services firms use automation to cut reporting from days to half a day
-
Data integration after an acquisition: How fast-growing companies stay in control
-
Boomi vs CloverDX for enterprise data integration
-
Boomi Alternatives: A Complete Guide (2026)
-
Why SaaS engineers are stuck doing manual customer data onboarding – and how to fix it