
Publishing data sites

One of the frequently used features of CloverDX is Data Services. Data Services allows you to publish your CloverDX transformations as REST APIs. A less obvious use of Data Services however, is its ability to serve content and therefore the ability to act as simple HTTP server.
This may come in handy when you need:
- More customized configuration frontends than Data Apps can provide
- Custom dashboards for metrics not available from monitoring page directly
- To publish help pages, instructions and project documentation
- Static content to be provided for download
In this tutorial, we will show you how to implement a custom dashboard providing a summary of successful/failed executions as a pie chart and line chart to visualize server utilization.
First steps
In our example, we will use CloverDX to serve some static content (e.g. HTML, CSS, images etc.) as well as dynamic content (data about Server’s utilization).
To start, we need few things:
- Have a place to store our static content (HTML, CSS, Javascript, images etc.);
- Data Service configured to serve the resources from this storage.
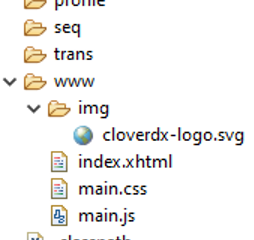
Usually when I build HTTP server, I dedicate a whole directory for web resources – typically called www in the project root - and reference it in workspace.prm using parameter like WWW_DIR = ${PROJECT}/www. This makes accessing resources easier a little and gives the project some order. I only use this directory for the web content and never put any CloverDX jobs (e.g. Data Services, graphs) or any other resources here. This allows me to keep the project structure clean and also increases security of the solution since it will be impossible to serve content outside of this directory and thus leak implementation details.
Default data-service directory is generally good place to put all Data Service jobs, including the one we will use to serve web resources.
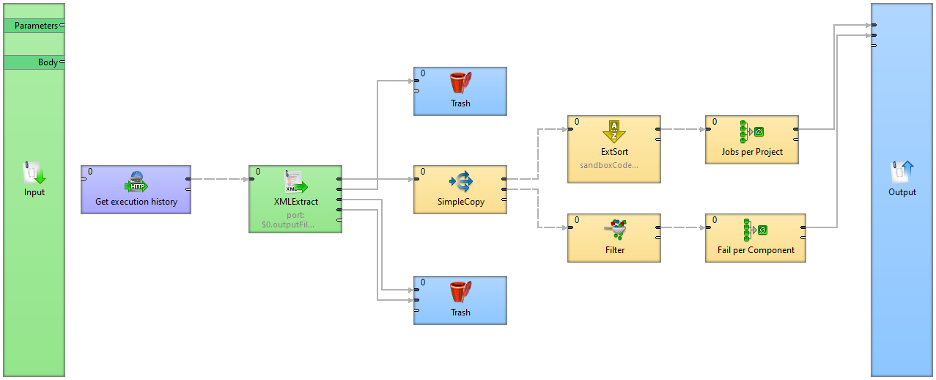
Data Service that will “implement web server” is extremely simple and can consist of a single component. We’ll use a Success component here since it does not require any inputs and allows us to access the output response.
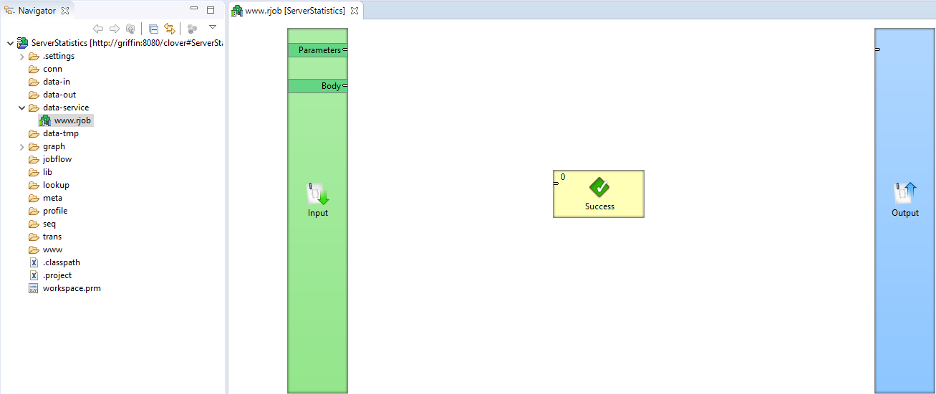
This component will be responsible for setting up the response content type based on the resource requested in the original http request. In my case, I expect to return 5 different types: HTML, Javascript, Cascading Style Sheets, Fonts and Vector images
//#CTL2

function integer transform() {
  securePath(toAbsolutePath("${WWW_DIR}/${file}"));
  setResponseContentType(getContentType("${file}"));
  return ALL;
}

/**
 * Checks requested path if points to subdirectory
 * of WWW_DIR; when not subdirectory, service will return error
 */

function void securePath(string s) {
  if (! startsWith(s,toAbsolutePath("${WWW_DIR}"))) {
    setResponseStatus(404,"Not found");
    raiseError("Resource unavailable");
  }
}

/**
 * Sets response content type from requested file's
 * extension
 */

function string getContentType(string s) {
  switch(s.getFileExtension()) {
    case "html":
    case "xhtml":
      return "text/html";
    case "css":
      return "text/css";
    case "svg":
      return "image/svg+xml";
    case "js":
      return "application/javascript";
    case "woff2":
      return "font/woff2";
  }
  return "text/plain";
}
Input configuration
To allow the Data Service to serve any content based on the name of the file, we use a simple (but not entirely obvious) configuration of the endpoint:

Notice configuration of Endpoint URL: /dashboard/www/{file:.*}
/dashboardis a prefix; I am using to distinguish between different sandbox services on same server. In this case, users will see it as the “application name” and it will make navigation within Data Services on the same server easier./wwwto separate web traffic from other (data provisioning) servicesfileis a parameter, containing path to requested resource.*is regular expression, matching full resource path from URL
Serving content
Last, but not least, we need to tell Data Service where to look for files. This can be done either from the same Endpoint Configuration screen (section Output) or using dialogue brought up by double-click on the Output pillar in design mode.
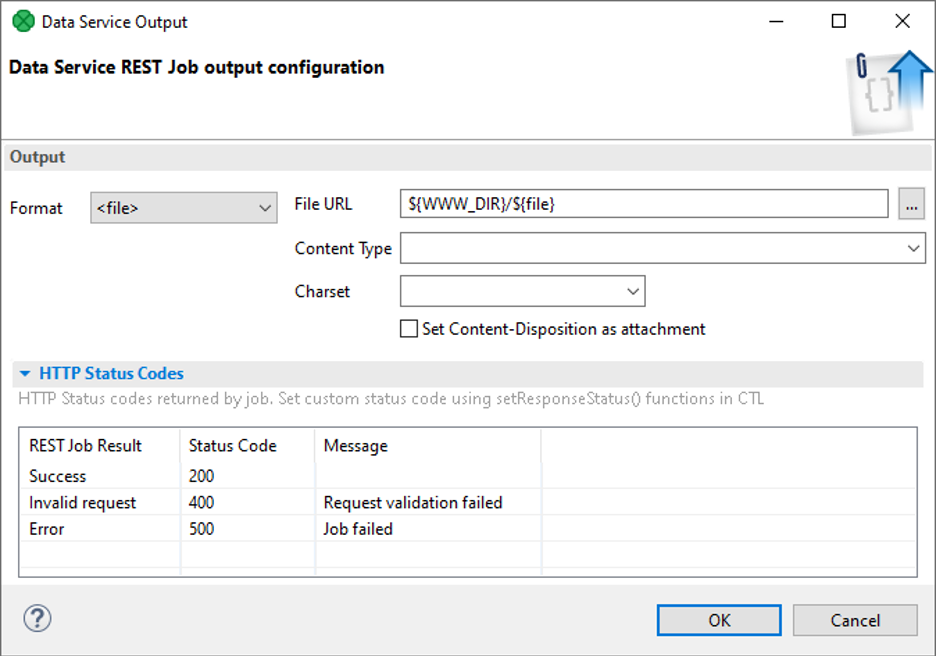
There are only 2 properties which need to be set:
- Format, and
- File URL.
Format must be set to <file> to tell the Data Service it will be returning a generic file as a response.
File URL consists of URL of the resource we want to serve as a response. In the above example I’m using the WWW_DIR variable to reference my www directory of the project and file parameter from HTTP context that contains the name of the resource caller asked for. Then, we’re ready to publish Data Service. We can do that by clicking on the Publish button in the upper-right part of the Endpoint configuration screen.
Additional configuration
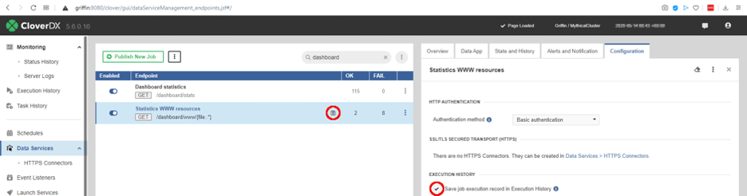
Now it is time to decide whether the site should be gated or not. Site security can be found in server console, Data Service module. Additionally, make sure this is not logged in execution history. This could easily flood server’s backend database with useless executions and render the log hard to work with. Enabled logging is indicated by an icon in Data Service list and can be disabled in Configuration, same as endpoint authentication.
First resource
When data service is all set up, it is time to create resources to be served. In case of our set example (dashboard), most of the complexity will sit with Javascript code rendering charts but that isn’t really a point of this tutorial.
To set baseline for our dashboard, create new index.xhtml in the root of WWW_DIR. None of the files need to have any special structure or follow any special guidelines. For example, our index.xhtml can reference both local and remote resources.
<!DOCTYPE html>
<html>
<head>
  <meta charset="UTF-8">
  <link rel="stylesheet" href="main.css" />
  <title>Custom dashboard | CloverDX</title>
</head>
<body>
  <header>
    <img src="img/cloverdx-logo.svg" />
    <span> | Dashboard</span>
  </header>
  <section id="dashboard">
  </section>
</body>
<script src="https://code.jquery.com/jquery-3.5.1.min.js" integrity="sha256-9/aliU8dGd2tb6OSsuzixeV4y/faTqgFtohetphbbj0=" crossorigin="anonymous"></script>
<script src="https://cdn.jsdelivr.net/npm/chart.js@2.8.0"></script>
<script src="main.js" type="text/javascript"></script>
</html>
Due to Data Service’s configuration, it is possible to reference local resources like main.js or img/cloverdx-logo.svg as if they would reside on real HTTP server. With frameworks like jQuery, it is trivial to build responsive sites. For purpose of this example, let’s assume we have Data Service set up on Endpoint URL /dashboard/stats, listening for GET requests, returning JSON document containing execution history statistical data.
To get results of statistics service, only simple jQuery (or any other AJAX code) snippet is required:
<!DOCTYPE html>
<html>
<head>
  <meta charset="UTF-8">
  <link rel="stylesheet" href="main.css" />
  <title>Custom dashboard | CloverDX</title>
</head>
<body>
  <header>
    <img src="img/cloverdx-logo.svg" />
    <span> | Dashboard</span>
  </header>
  <section id="dashboard">
  </section>
</body>
<script src="https://code.jquery.com/jquery-3.5.1.min.js" integrity="sha256-9/aliU8dGd2tb6OSsuzixeV4y/faTqgFtohetphbbj0=" crossorigin="anonymous"></script>
<script src="https://cdn.jsdelivr.net/npm/chart.js@2.8.0"></script>
<script src="main.js" type="text/javascript"></script>
</html>
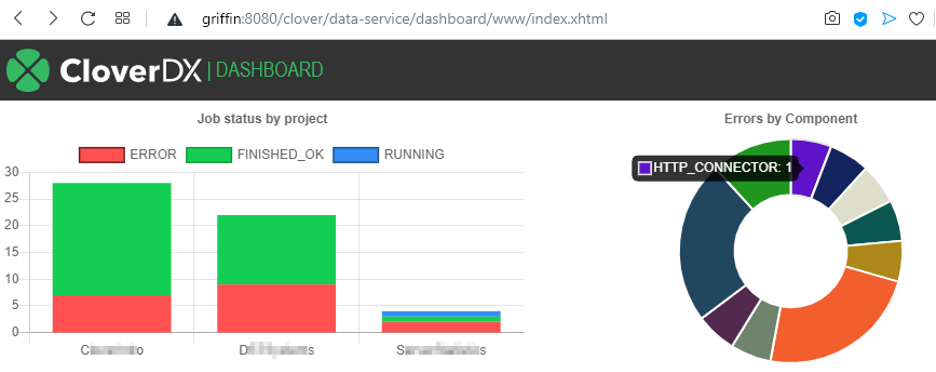
With some additional scripting and CSS, result may look as this:
Security
Data Services are published via HTTP(S) and access to them is protected using Basic authentication. If additional security (2 factor, OAuth2, …) is required, we recommend using web proxy to provision it.
User access control on the Server guarantees, only users with a sufficiently permissioned account on CloverDX Server or connected LDAP can see and access published endpoints. Smallest granularity of CloverDX UAC is on sandbox level, i.e. if some parts of same application need to be gated separately, they must be split into multiple sandboxes. Example: server performance statistics are available to everyone (CPU, memory usage) but project-specific ones to respective owners on the same dashboard.
These UAC settings are part of sandbox group permissions on CloverDX Server and can be modified via the Server Console.
Endpoint encryption is inherited from the application container your server runs on top of. It is possible to set up separate HTTPS connectors to use different certificates and ports for different endpoints.
More from Tech Blog
-
CloverDX Server diagnostics with ChatGPT or Claude via MCP
Administrating a healthy CloverDX Server usually means correlating information scattered across performance logs, job tracking tables, execution logs,... AI -
Data Quality Examples on GitHub
As our first set of examples, we published a project called DataQualityExamples which demonstrates how users can address their data quality issues with... CloverDX How-To -
Introducing CloverDX Examples on GitHub
We’re excited to introduce the CloverDX Examples repository on GitHub. The repository is a growing collection of helpful and practical examples designed to... CloverDX How-To -
Sending emails via Azure Communication Services SMTP
There are many situations where it is helpful to get a message from your active pipelines. These may include logs, summaries of successful completion, or... Cloud -
Connecting to REST APIs (OpenAPI)
Connecting to REST APIs is a crucial aspect of modern data integration, and the REST Connector in CloverDX provides a streamlined approach. The video below... RESTConnector -
Performance tuning: How to troubleshoot database-related performance issues in CloverDX
Performance is undoubtedly one of the key factors when running data transformations. In this article, we will look at how to troubleshoot database-related... Performance
Visit CloverDX Blog
-
How financial services firms use automation to cut reporting from days to half a day
-
Data integration after an acquisition: How fast-growing companies stay in control
-
Boomi vs CloverDX for enterprise data integration
-
Boomi Alternatives: A Complete Guide (2026)
-
Why SaaS engineers are stuck doing manual customer data onboarding – and how to fix it