Metadata propagation is one of the many features introduced in CloverDX 4.0. In our previous post we covered its basic principles. This article will further explain why, where, and how to use it. We'll go through typical examples, as well as reveal details of how it works, so you get a better understanding of metadata propagation in CloverDX.
Metadata propagation, apart from speeding up your work, is also a deeper concept, allowing the creation of generic graphs that are independent of your metadata structure. Although it was slightly overshadowed by subgraphs in CloverDX 4.0, metadata propagation is a very important and powerful feature which can be extremely helpful for both regular graphs and subgraphs.
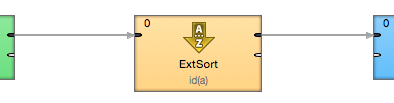
Let's look at the simplest case. For components that never change their record structure (metadata) - ExtSort in this case - it is obvious you'll need to have identical metadata for both the input and output.
In order to do that, you had to assign metadata to each edge manually in previous versions of CloverDX:
A solid edge indicates manually assigned metadata.
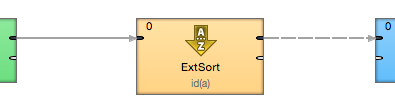
The same part of the graph in CloverDX 4.0 now looks like this:
A dashed edge indicates manually assigned metadata.
Both graphs look similar; however, there is one huge difference. The second (dashed) edge indicates there are no metadata assigned manually to the edge. Metadata are propagated automatically through the component.
Do you want to use different metadata? No problem. Just change the metadata on the input edge, and the output edge’s metadata will automatically update, too. This is a major improvement for anyone creating graphs.
To indicate metadata propagation taking place, CloverDX will flash a yellow rectangle for a moment over the edge to show where the metadata was propagated.
A yellow rectangle on the edge indicates change in assigned metadata.
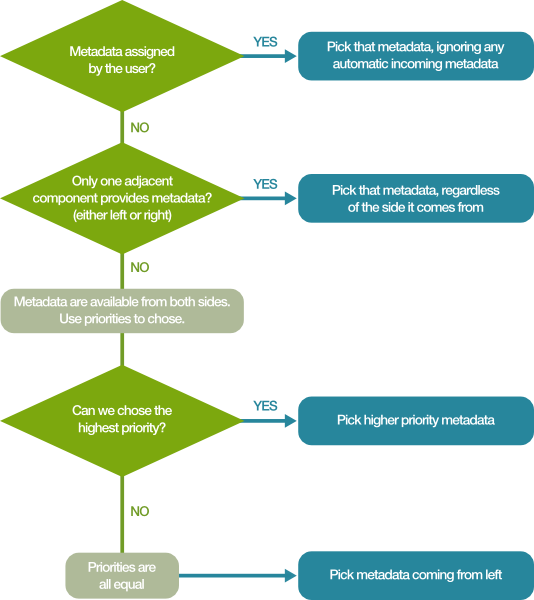
It's clear that that sometimes, an edge can be affected by metadata from multiple components. To choose which one will be affected, propagation follows a set of priorities.
There are three priorities of metadata in CloverDX:
And now, how does propagation actually work? Each edge in a graph uses the logic illustrated in the graph below:
The above algorithm works the same when metadata are propagated from subgraphs. You just need to keep in mind that although a subgraph looks like a single component, there are actually multiple components and edges inside it. Thus, its metadata can have any priority, depending on how the subgraph is wired (e.g. user-assigned metadata inside the subgraph will propagate from the subgraph with first priority, followed by metadata assigned by a component with second-level priority, and so on).
To better illustrate these previous rules, lets go together through a few examples.
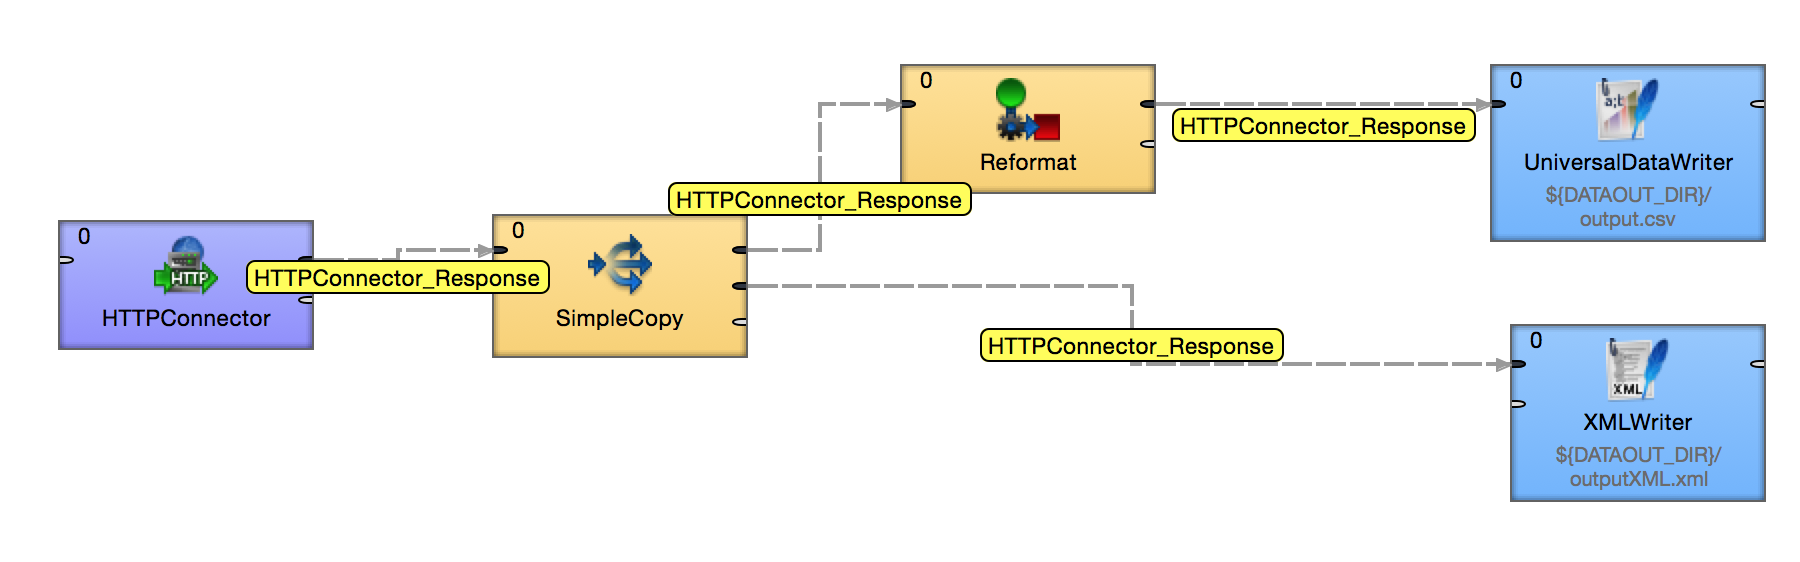
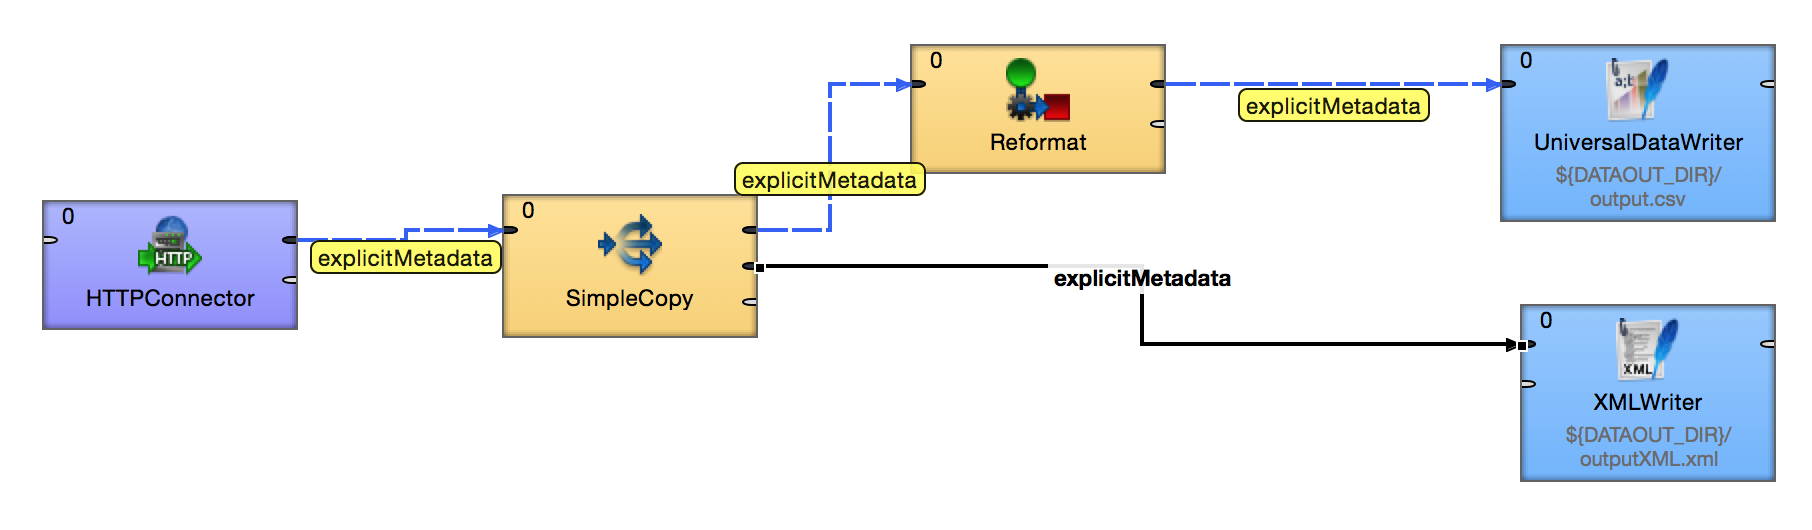
The first example shows a graph fully covered by metadata propagation. No edge has metadata directly assigned. Metadata are generated via an HTTPConnector component. They then pass through a SimpleCopy and Reformat component.
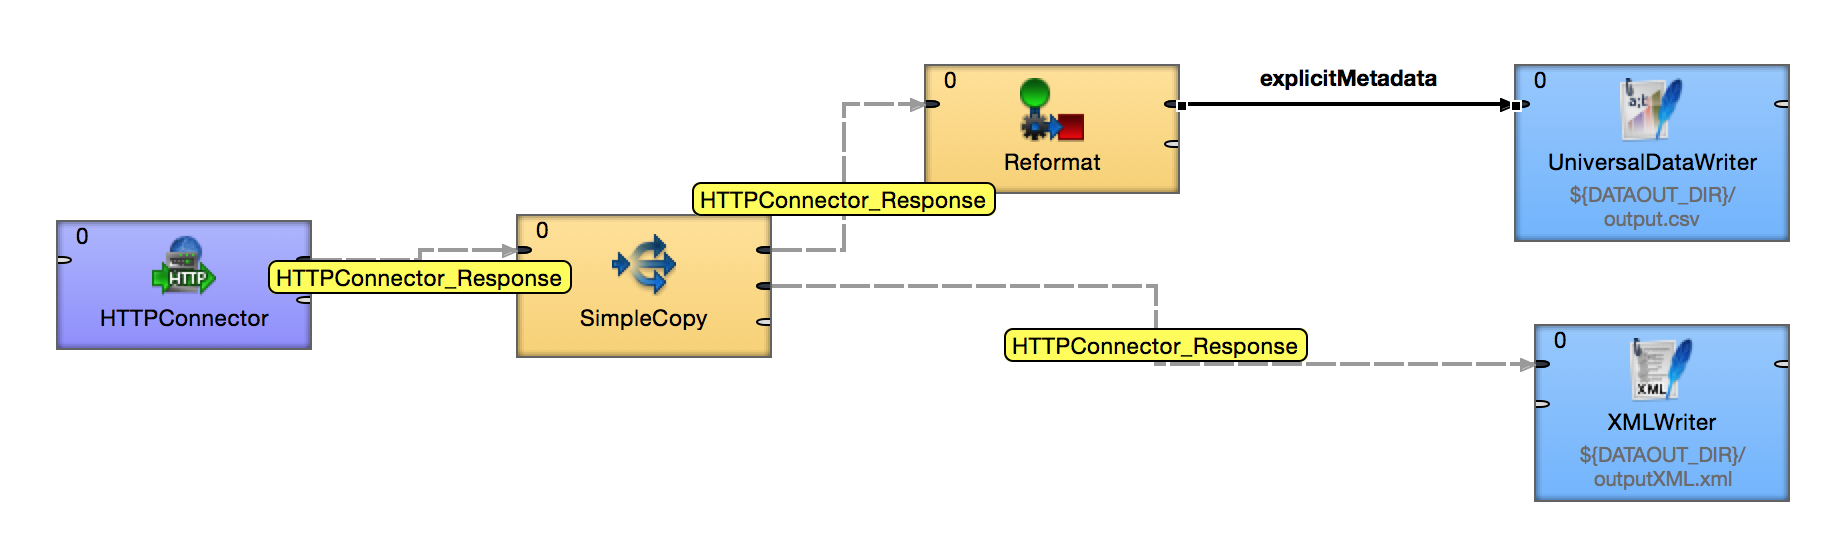
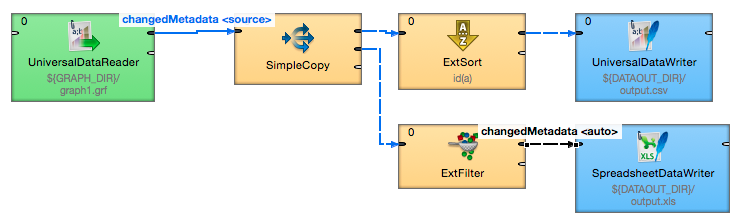
In the next graph, the user has explicitly assigned metadata to the edge from SimpleCopy to XMLWriter. This kind of metadata are propagated to the rest of graph for two reasons: the SimpleCopy propagates in all directions, and the explicitly-assigned metadata has the highest priority. Here, it overrides the metadata generated by the HTTPConnector.
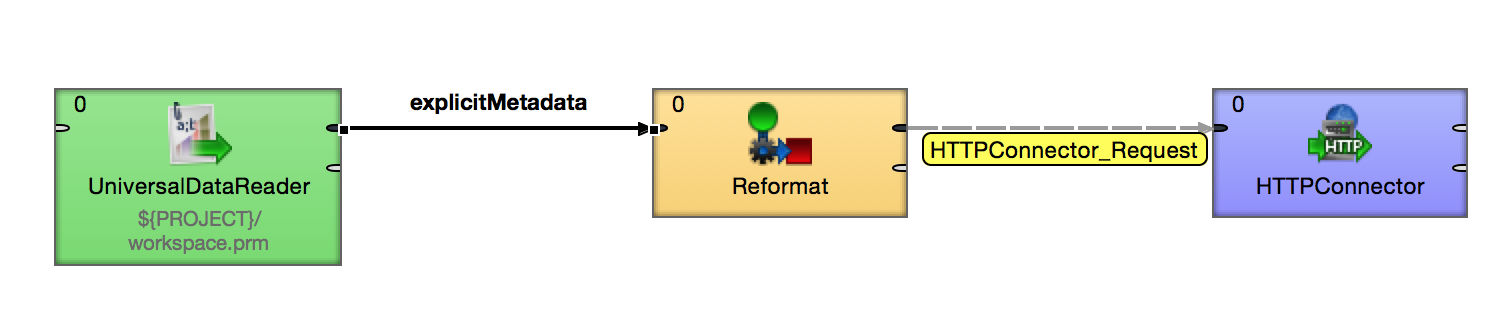
A similar example; however, here we have explicitly-specified metadata on the Reformat-UniversalDataWriter edge. Although propagation normally works in both left-right and right-left directions, in this case it does not, because reformat will only try to propagate from the right (and with low priority too).
This important case shows how exactly the Reformat component propagates metadata. It propagates from left to right only and with lowest priority. Therefore, explicitly-assigned metadata on the left edge of this example are deprioritized in Reformat, and the edge will instead take the metadata from right side (HTTPConnector generates its own metadata – see priority 2.
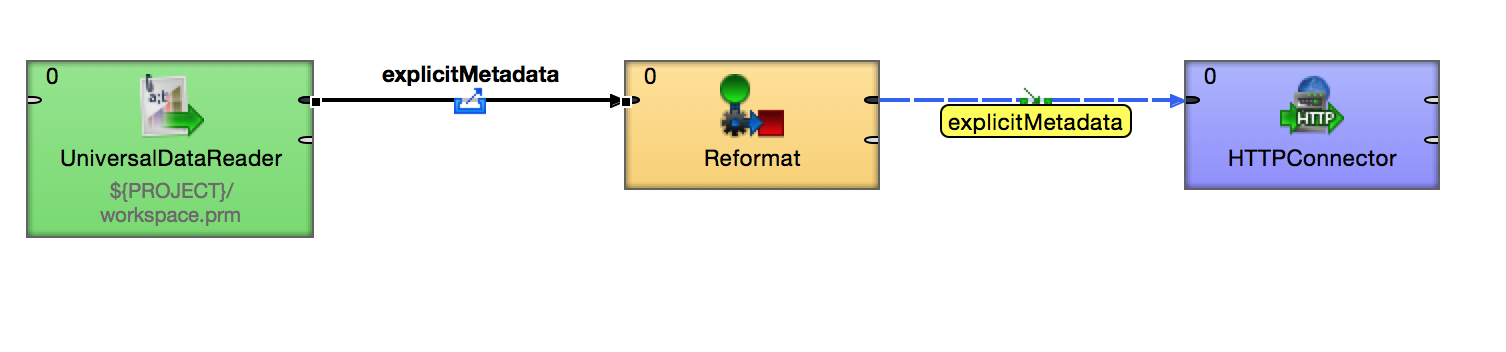
Connecting Reformat to a component that DOES NOT generate or propagate metadata to the left will cause the edge to use the weakly-propagated metadata. But remember: this metadata will have the lowest priority, so any metadata coming from the right side would eventually override it.
Of course, the user can still control metadata propagation manually, like by using explicit metadata propagation (as shown in the example above). Explicit metadata propagation is visualized by an icon with a small arrow. It is blue on the source edge and green on the target edge. This setup means the “green” edge will inherit metadata from its “green” sibling, no matter where that metadata comes from.
I’ve seen many users confused by the “magic” of metadata propagation at first. However, when you get familiar with it, it's a lot of fun to use.
If there are any doubts, on how metadata propagation works or what happened in your graph, CloverDX offers a few tools to help analyze and understand what is going on in your graph.
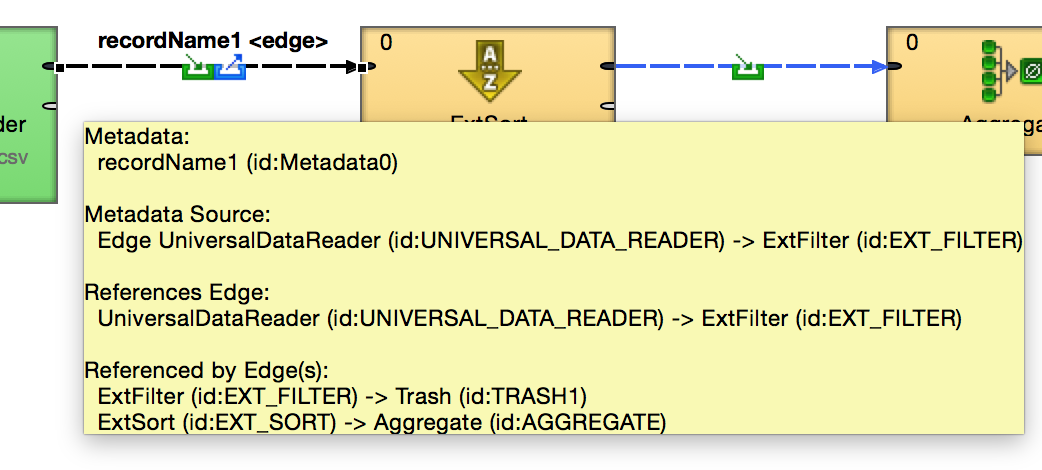
If you are not sure why an edge contains some metadata, the first place to look is a tooltip on the edge. You'll find the source of the metadata, what component is referencing it, etc.
In this example the first edge use metadata from UniversalDataReader-ExtFilter edge (as a metadata source) and also provides metadata for the two other edges listed at the end.
The “Go To” action lets you navigate the graph more easily, helping you to find parts of a graph related to a selected edge. You can go to the source or target component for an edge and, if there is metadata propagation on that edge, you can navigate to the source of the metadata or its predecessor (in case of metadata propagated in multiple steps).
This way, you can easily track the metadata path from the edge to its root source. It helps a lot if you want to understand metadata propagation more precisely.
The graph editor itself offers another way to check metadata in your graph. If you select an edge, a label will appear over it, showing the metadata used. All other edges in the graph using the same metadata are highlighted in blue. In case of metadata propagation, the source edge shows the metadata name, too, with a “<source>” label.
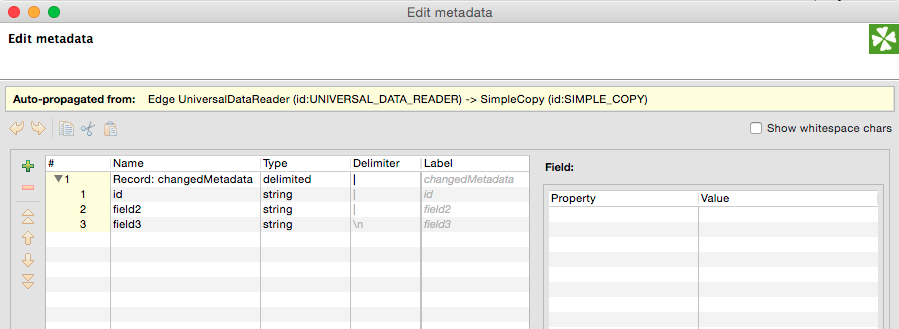
The metadata editor can also provide you with information about which metadata is being propagated. If you open the metadata editor on an edge which has propagated metadata, you will see some informative text about the metadata source along the top part of the dialogue box.
Metadata propagation is powerful, but it may also look a little bit complicated and unpredictable. There is nothing easier than trying it for yourself. I’m pretty sure you will get the hang of it quickly, and you will enjoy faster and easier graph design. Of course, if you still feel a bit uncomfortable with the concept, you can always explicitly assign metadata to each edge in your graph at any time to be sure. The graph design used in CloverDX 3.5 and older is still valid and functional; you can go back to it any time. But you won’t want to – I promise.
If you'd like to see more about metadata propagation in action, check out our video here: