MongoDB is a leading NoSQL database popular among modern agile developers. Promoting a data-agnostic document model and native scalability, it provides quick start-up and high performance without the need to define data structures and relationships up front.
At CloverDX, we want to bring our users connectivity to every popular or widely adopted data source. With over 40 million downloads, we'd say that MongoDB fits this description. That’s why CloverETL 3.5 (now CloverDX) introduced the ability to work directly with MongoDB, using native MongoDB connections and three components:
These components allow you to handle any document stored in MongoDB and allow you to easily map between JSON documents stored in MongoDB and records used by CloverDX.
With this in mind, let’s look at a simple example to demonstrate the power of MongoDB connection with CloverDX. Here, we’ll use CloverDX to combine data from two MongoDB collections into a third one.
There are three ways of joining two collections like this:
In this article, we’ll use CloverDX to implement the data transformation in order to join two collections, producing a third one and then write the output back to MongoDB.
Our sample data contains information about people (in people collection) and their dogs (dogs collection). These collections can look like the following examples in MongoDB:
People:
db.people.insert([
{ _id: "1", name: { first: "Albert", last: "Einstein" } },
{ _id: "2", name: { first: "Stephen", last: "Hawking" } },
{ _id: "3", name: { first: "Richard", last: "Feynman" } }
])
Dogs:
db.dogs.insert([
{ personId: "3", dogName: "Venus" },
{ personId: "1", dogName: "Chico Marx" },
{ personId: "1", dogName: "Stella" },
{ personId: "3", dogName: "Loki" }
])
The joined output collection should contain documents like this:
{
_id: <id>,
name: {
first: <first_name>,
last: <last_name>
},
dogs: [
<list_of_dog_names>
]
}
Since MongoDB cannot join these two collections together, we’ll need to use CloverDX to do that. Our approach is quite simple:
To connect to a MongoDB instance, we’ll need to create a MongoDB connection. Connections can be created from Outline view when you right-click on the Connections tree node and select Create MongoDB connection or directly from any MongoDB component from its Connection property drop-down.
Next, we read the data using the MongoDBReader component. It reads data from the Mongo database using the ‘find’ method but can also call other methods like ‘aggregate’, ‘count’ or ‘distinct’.
The component returns data in two formats – as raw JSON document and as partially parsed map[string, string] of all top-level fields:
The stringValue field is the raw JSON document that can be easily sent for further parsing via JSONExtract or JSONReader components.
However, if you only need top-level fields from the JSON, using the jsonObject map might be easier. Just remember that complex types will be stored as full JSON subtree in the map and will need to be parsed. In which case, it might be easier to use the separate parser component anyway.
Download the CloverDX code used in this exampleA typical way to use the MongoDBReader is to specify a MongoDB connection and a collection. This will perform the default “find” operation. Additionally, you can specify a query, a projection, a skip, limit counts, and other attributes to fine-tune your query if needed.
In our case, the default settings of the component are fine to read the whole collection. For example, to read all documents from people collection, we can use the following settings:
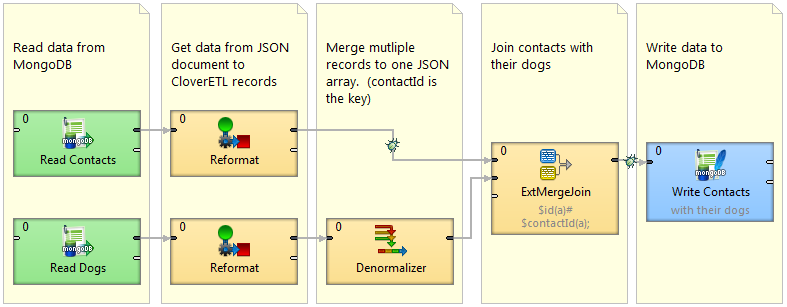
After extracting the data from MongoDB, we need to join the two sets. We want to create an array of dogs belonging to every contact, so we need to merge all dogs belonging to a single contact into a single record. This can be done in a Denormalizer component. Then, we can join the new record with the contact, using an ExtMergeJoin component.
We want to store our new collection in MongoDB as well, so we’ll use a MongoDBWriter component to write the data to Mongo instance. MongoDBWriter can use the same connection we defined before and its configuration is similar to what we’ve done before for the reader.
The structure the component works with allows user to define the target collection, the query that specifies how to perform the operation as well as the data to write to the collection:
In our case, we can use “insertOne” operation in MongoDB:
The finished graph should look just like the following screenshot:
This is only one example of how CloverDX can help you integrate with MongoDB. If you want full data integration functionality that works well with other data sources like relation databases, web services or files, get in touch today.
Of course, MongoDB is not the only NoSQL database you can use with CloverDX. You can very easily use CloverDX with CosmosDB (a globally distributed multi-model database hosted on Azure) or other NoSQL databases that often provide interface similar to MongoDB. In some cases (like the CosmosDB) you can use our MongoDB components to talk to them directly since they provide APIs that are compatible with MongoDB API.
Download the CloverDX code used in this example