As the world’s number one cloud-based customer relationship management (CRM) platform, there’s no doubt that Salesforce is a crucial part of many sales strategies. For this reason, any Salesforce data integrations need to seamlessly connect internal data systems with the application, reducing the time your team spends jumping between different tools.
This not only makes it easier to read, insert, update and delete data, it also accelerates the time it takes to turn it into valuable, 360-degree customer insights. With the right approach to data integration, your business can invest more time and energy into customer personalization, upselling opportunities, and identifying customer trends.
In this blog post, we’ll show you how CloverDX’s Salesforce Connector can take away the pain of manual data integration and automate the processes that bottleneck your team.
In an effort to constantly improve the lives of our users, we developed a powerful, user-friendly Salesforce connector in CloverDX 4.3. With this connector, you can easily view, transfer, update and delete Salesforce data, without having to worry about how the two systems talk to one another. And the best part? There are only three simple components you’ll need to know.
With three new components at hand, SalesforceBulkReader, SalesforceBulkWriter and SalesforceWriter you no longer need to manage a jobflow of API calls yourself. The components work just like any other modern reader or writer - just a few simple controls and you’re there.
The two bulk components use Salesforce Bulk API which is great for working with batches of data, large and small. However, beware of some limitations. First, it’s not optimized for quick repeated calls. Each operation takes at least a few seconds to perform so you don’t want to use it for realtime or near real time processes. In most cases you’ll use CloverDX for moving larger datasets anyway so you should be fine in this department. Secondly, SOQL queries (Salesforce’s query language similar to SQL) are somewhat limited with this API (e.g. no support for subqueries). After all, the rationale behind all this is performance, and you’re getting plenty of it.
Also, keep in mind that using Salesforce components counts towards your API limits. Each read or write takes 7 calls (or more with data sets > 1 GB).
The third component, the SalesforceWriter, uses the standard SOAP API which has some pros and cons compared to the other one. First of all, with SOAP you're using less API calls per write from your Salesforce limit (1 for SOAP vs 7 at least with Bulk API). However, it's not designed for writing large data sets - 200 records per one write maximum. You get better support for advanced SOQL statements and mainly, support for writing Attachments.
Now that we’ve given you a rundown of how the connector works, let’s take a closer look at how you can use these jobflows to build a better Salesforce data integration experience.
You’ll need a login, password and security token for your Salesforce instance before starting with CloverDX.
Don’t worry if you don’t have your security token now. You can easily obtain yours by navigating to your account settings.
Get Security Token:
Just like other connectors in CloverDX, you create a connection first.
Securing your credentials: Note, that you can use parameters (or secure parameters) in this dialog. Simply type in the parameter name, e.g. ${SALESFORCE_PASSWORD}, in place of the masked values.
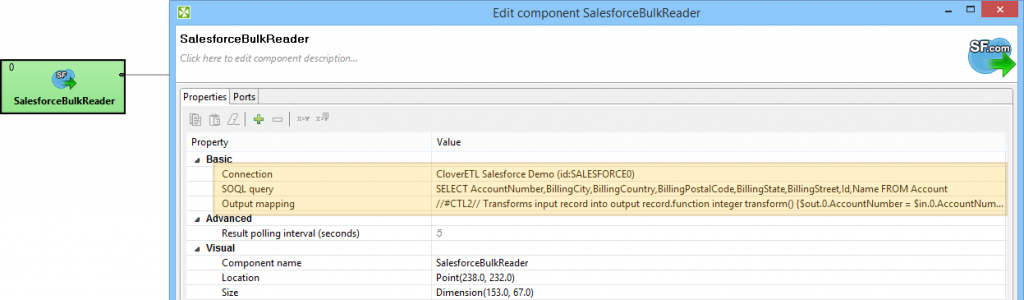
SalesforceBulkReader component takes the previously defined connection and a SOQL query.
SalesforceBulkReader with SOQL query
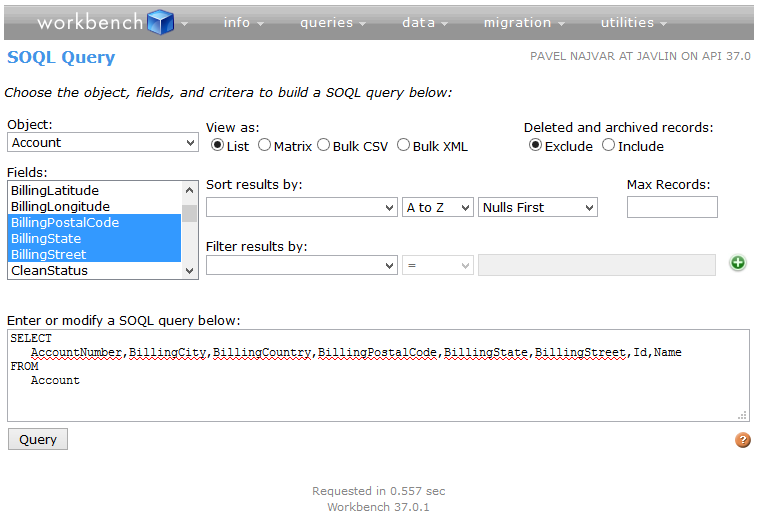
There is a great SOQL Query tool as part of the Salesforce developer Workbench that let’s you select objects, fields and filters to generate queries visually right from within your SFDC instance. I recommend checking the tool out. It’s a great help if you don’t remember all the objects and fields names in your system.
SOQL Query tool
Your query dictates the internal fields which you can use in the component’s Output Mapping parameter. If you want to create CloverDX metadata from the query, just drag and drop the fields from left to right. Nonetheless, you don’t have to set any mapping at all. In such case the component will try to map Salesforce fields to your metadata automatically by field names.
Create metadata from Salesforce query by dragging fields from left to right
Beware of compound fields, such as BillingAddress. These aren’t supported by the underlying API and thus you’ll get an error (FUNCTIONALITY_NOT_ENABLED). To read address data, you have to select individual address fields instead of the compound.
To use dates in the SOQL query, you’ll need to use the following format: CreatedDate >= 2016-07-27T00:00:00Z
In most cases you'll be using SalesforceBulkWriter for all operations that modify or insert data in your Salesforce database. If you need to write attachments, please refer to Attachments section.
To insert data, simply map your input records onto automatically generated fields in the selected target object (right panel of the Input Mapping dialog).
Propagating generated ObjectIDs is extremely easy. Notice the graph below. I just connected a writer (“Accepted”). Without any further configuration, the output metadata is propagated as an exact replica of your input, with additional “ObjectId” field that’s populated with Salesforce internal IDs of the newly created records. This is very useful for cascading writes of dependent objects (e.g write all Accounts first, then join the “accepted” stream with Contacts using your own IDs and finally use the joined Account’s ObjectId as parent in the inserted Contact).
Update operation works just like Insert, you just need to make sure you map “Id” field which tells Salesforce which record to update (you’ll find it in Input Mapping option).
To simulate “UPDATE <table> WHERE <condition>” you’d use SalesforceBulkReader to fetch object Id’s (the WHERE part) and then a SalesforceBulkWriter with “Update” as Operation and properly mapped “Id”
Only fields that you actually map in Input Mapping are updated, so don’t to worry about accidentally overwriting your data.
Update or Insert (aka “Upsert”) is a common operation where you want to insert new records and update existing ones in a single run.
You’ll need to set “Upsert external ID field” - name of a field you want to use as a key to determine whether a record needs to be updated (if the same key is found in the database) or inserted. Obviously, this does not have to be actual Id - for example, you can use email address to determine whether a record gets inserted or updated.
Deleting records follows similar methodology and configuration as Update. Only this time you’re allowed to map only the “Id” field.
By the way, if you try to delete multiple records from Salesforce web interface, you’ll quickly realize you can delete only 250 records at a time. The reason for this eludes me but having a mass delete operation in CloverETL is a blessing in this case (there’s no such limitation there).
Standard delete operation does not physically remove the data from your database, it merely moves it to Recycle Bin. In order to remove data right away, without having to take out the trash, you can use Hard Delete. However, this operation requires elevated permissions - read this short article on how to set up the Bulk API Hard Delete permission for your account. This operation is only available in the SalesforceBulkWriter.
You can use CloverDX to upload and manipulate attachments in Salesforce. In order to write or update attachments (Attachment object) you'll have to use the SalesforceWriter component (the SOAP-based one). Remember, it won't work with SalesforceBulkWriter.
You can either upload attachments from files by mapping records with filenames in them (Body_FileURL), or you can pass binary data directly through the input edge (Body). You'll need to have Salesforce ParentId of an object to associate the Attachment with.
You may have noticed the SalesforceBulkWriter component has a second output port. If connected, records that are rejected from the operation will get send to this port, with additional information in the automatically added “Error” field. If you don’t connect the error port, the component will fail on the first error.
With more and more businesses seeing the value of investing in a CRM system, it’s vital organisations like yours spend time optimizing the data integration processes that keep your sales pipeline running.
With CloverDX's Salesforce Connector, you can streamline your Salesforce data integration by limiting the time it takes to move data from one system to another. With the ability to read, insert, update and delete your data automatically, you retain full control over your data pipeline, without having to manually manage the nuts and volts of the integration process. For your sales team, this means quicker and more efficient insights into lead and customer activity.
Hopefully, this guide has given you an insight into how you can get more from your Salesforce experience with a simple addition to your data integration strategy. But, if you’re keen to discover more, take a look at how we helped a leading wealth management firm reduce their Salesforce load time from 12 hours to 40 minutes.