Before your data enters the ETL process, it's in your best interest to only work with "good" data. That is, the data that conforms to its respective domain rules, ranges, allowed values, and perhaps other unusual restrictions. If it doesn't, you'll want to log and remove all erroneous records so as not to pollute your transformation, as well as to have means to report and fix the data later on.
Having data checked and verified in the transformation goes hand in hand with CloverDX's mission of rapid data integration. With the right tools out of the box, along with an easy setup and immediate actionable results, it takes less trial and error and time to achieve the expected outcomes.
Let's take a look at how this all works in Clover.
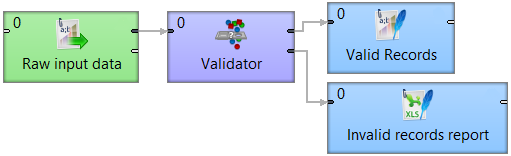
Validator, a part of the CloverDX Data Quality package, is a comprehensive filtering tool that lets you visually define data quality rules. What does this mean? Simply put, Validator is a component where you specify a set of checks that filter incoming data. Anything that the filter doesn't let through is reported along with detailed information about the reasons why. You can use this output as a basis for correcting problems; what's great about this is even the non-technical team members in your organization can work with and understand the process. Imagine putting the output into a spreadsheet and sending it back to the accounting department to fix the problems – no "translation" needed!
Built-in data validation rules can check various data quality characteristics, like date format, numeric value, interval match, phone number validity and format, and more. If you have special requirements, you can implement custom validation rules in CTL (CloverDX Transformation Language).
Validator nicely complements the Data Profiler in the Data Quality package. Generally, you start with Data Profiler to assess the overall condition of your data using statistics. Seeing variations of formats, missing values, and excessive ranges indicates which fields will need special care when setting up Validator. This will make sure no bad records get through. Validator acts as the second stage of checks for specific problems in your data and reports each one of them to you. Used in conjunction, these tools allow for efficient, comprehensive data quality.
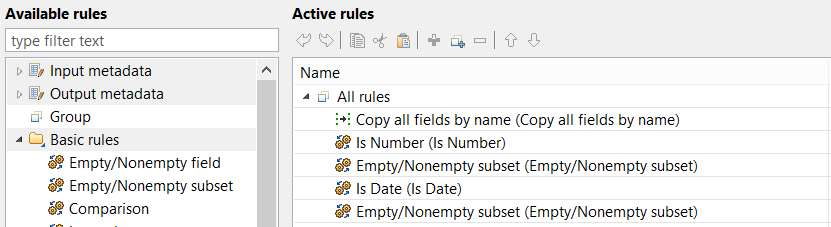
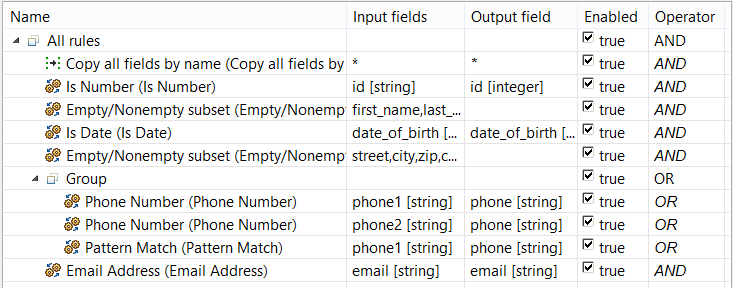
The single most important concept in Validator is a validation rule. You can look at rules as Boolean operators checking field values and returning either a success or failure. You can create complex combinations by putting multiple rules into groups, which can be either evaluated as "all rules in the group must pass" (AND) or "at least one must pass", i.e. OR.
To add a new active rule, drop one of the available rules to the active rules list, then click the corresponding Input fields property and select a field to which you want to apply this rule. You can also use drag and drop to set Input fields – just drag fields from Input metadata to any active rule. Some rules can be further configured on the Properties tab below the list.
Along with basic checks, you can do pretty cool things with two interesting rules in the Basic rules palette. First, with the Lookup rule, you can match field values against any type of lookup table. (Note: You'll need to have the lookup table previously defined or linked in your graph.) Secondly, the Expression rule let you do a little bit of programming and define simple custom filter expression to validate the data. This rule works to ExtFilter component with a filter expression.
String rules is a special category of rules that applies to string fields and can not only be used as checks, but also as conversion functions. For example, let's take a look at an instance where the raw data you get as a CSV file is a complete mess. If you were to create proper metadata for this file, you would lose a lot of records solely because the parser would skip all those misspelled numbers, ad-hoc date formats, etc.
Instead, define the metadata for reading as "all string fields", and let Validator try to find out which are good, and thus convertible, and which are bad. You can connect an output edge with non-string type fields and use these rules to convert the values for you automatically - e.g. string to date or string to number.
Every active rule can be, and typically needs to be configured. The configuration of a rule usually specifies which input field will be validated by this rule, then sets rule-specific parameters, like the date format mask for rules that parse validated strings as dates.
By default, there is a "Copy all by name" rule at the beginning of the validation tree. This ensures that Validator will send validated values to output fields with matching names and types. All rules can also write the validated input value to any explicitly specified output field.
As said earlier, Validator can also convert incoming string values to a specific target data type – for example, date or integer. This can be done in rules like "Is Date" and "Is Number". These allow you to specify an output field that's of the desired target type.
There are two special Assignment rules available to you, both of which copy data from selected input fields into desired output fields. The Copy rule copies a single input field to a single output field (1:1), while the Transform rule allows you to specify a CTL transformation that can do an arbitrary field assignment (M:N). With this, Validator can transform your input data based on conditions found in your data. By placing the Assignment rules into different branches of your validation tree, you can control which fields will be selected from the input data and which are not going to be used in Validator's output.
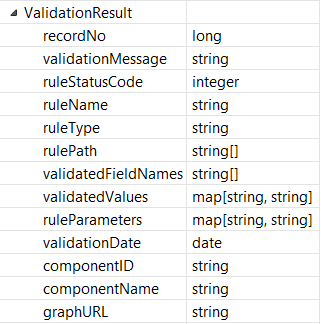
The second important configuration setting of the Validator component is "Error output mapping". Here, various validation error details can be mapped onto the component's second output port fields.
By connecting a writer component to this port, you can generate your validation error reports. In these reports, you can include the number of the record that did not pass the validation, validation message that describes the problem found in your data, the name of the rule that detected the problem, names and actual values of validated fields, and the identification of this Validator component. Error reports serve as an important entry point for fixing problems in your data.
Ensure high data quality with CloverDX's Validator. By defining set rules, you'll avoid data inconsistency, in turn allowing for better, workable data.
We hope you've found this run-through useful. If you need more help, don't hesitate to get in touch.