Cloud computing has become ubiquitous in modern business. It seems for every mission-critical process, there’s a cloud service that can help you optimize it. Data warehousing is one such process that benefits from the cloud treatment, with Amazon’s Redshift enabling large-scale analysis of multiple data sources.
In this guide, we’ll walk you through the process of loading data into Amazon Redshift and demonstrate how CloverDX can accelerate your data migration process.
Amazon Redshift is a fast, scalable data warehouse that makes it simple and cost-effective to analyze all your data across your data warehouse and data lake. You can start with just a few hundred gigabytes of data and scale to a petabyte or more.
While there are plenty of challenges that come with data migration, including lack of standardization and poor system design, when you use Clover DX, loading data into Amazon Redshift is easy as ABC. This means you spend less time migrating and more time uncovering insights within your data.
In this tutorial, we’ll show you how to create transformations that read data from the source and load it into Redshift. Luckily, this will work with any data source.
With the help of CloverDX, you’ll be able to load data to Redshift with very little effort and in a matter of minutes. There’s a reason we call it rapid data integration.
Uploading data to Amazon Redshift with CloverDX is easy as ABC.
Let’s start with a little bit of theory – enough to explain the basics. Amazon Redshift allows you to upload data in many ways. However, its documentation recommends that you use the COPY command from S3. During our testing we confirmed that COPY from S3 is by far the fastest solution. So, we’ll use the COPY command with Amazon S3 bucket. CloverDX will get the data, prepare it, and upload it to Amazon S3. Afterwards, it’ll invoke the COPY command and move data to Redshift.
In order to move data to Redshift, you’ll need a two-step data integration process.
In the first step, connect to the source of the data – in this case, it’s MongoDB. To connect to MongoDB, the standard CloverDX connector will be used. Just fill in all necessary fields and you’re good to go.
The second step, uploading, will be a little trickier. Rather than putting the whole transformation into a single graph, it’s actually much better to create a subgraph that will take care of the upload to Redshift. Among its many advantages, subgraphs are reusable, making any data integration that involves uploads to Redshift fast and easy.
The trickier part is handled in the subgraph.
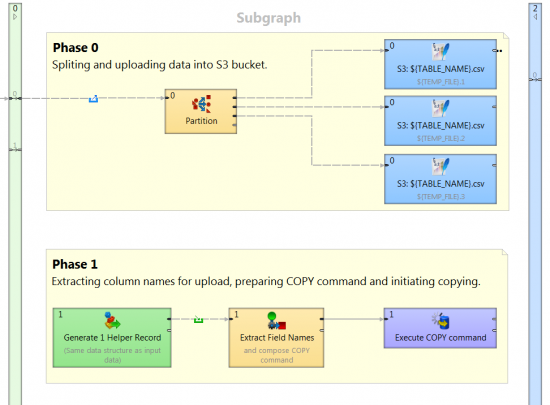
To make sure that the COPY command is executed only after all S3 uploads are finished, you’ll need to set two different phases in subgraph.
Split incoming data into several csv files. It's not necessary, but we suggest you do it to utilize parallel processing in the cloud. Then upload data to S3. CloverDX has native support of S3, so writing to the cloud is like writing to any other destination.
When the data is stored in the S3 bucket, the subgraph extracts the field names from metadata, prepares the COPY command, and executes it using the DBExecute component.
copy DBTableName (id, field1, field2, field3)
from 's3://${S3_BUCKET_NAME}/data_load/DBTableName_insert_${RUN_ID}.csv'
credentials 'aws_access_key_id=${AWS_ACCESS_KEY};aws_secret_access_key=${AWS_SECRET_KEY}'
delimiter '|'
removequotes
runcatecolumns
Now, just place the subgraph into the graph like any other component. Set your parameters (Amazon credentials – related to S3 and Redshift, table name), connect an edge to it, and you are good to go.
The beauty of this is that the Redshift subgraph is completely universal. It takes the credentials and the table name as the input parameter. Data comes on the input edge and field names are extracted automatically from metadata. You can use this subgraph to store any data to Redshift. Additionally, you can perform any other data operation you want before loading data into Redshift – like combing data from multiple sources, validating it, or filtering it. Whatever you need.
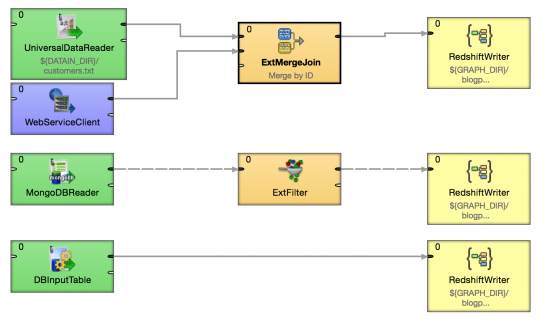
To better grasp the versatility of this subgraph, let’s take a look at the example below. It performs three Amazon Redshift uploads. The first one combines data from the file and SOAP web service. The second one filters data from MongoDB, and the third one just moves the data from the database.
As you can see, it’s easy to use CloverDX to load data to Amazon Redshift. No matter the source of your data, using this subgraph will help you upload it in just a few minutes.
Let’s review the key steps:
Following these 7 simple steps will help you take control of the data loading process and reduce the time it takes to complete simple tasks. But, before we leave you, here are few other useful tips:
Of course, loading data is just one part of the data migration process. Our tools also handle large-scale, data intensive operations, so no matter what your data problem, we can help you move from concept to working solution quicker than ever before.
To see the power of automated data migration for yourself, download CloverDX for free and try the Redshift Writer Subgraph created in this blog.
Ebook: Data Migration for Humans - Make your data migration a success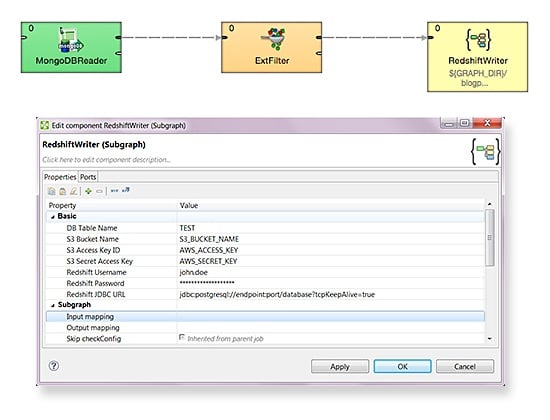