Today, reporting and analytics are big. There’s a visible shift in the perception of business intelligence among medium and small businesses. Previously, BI was a domain of big enterprises and intimidating IT budgets; now, it can be achieved DIY-style, with affordable, easy-to-use tools. Data, of course, is a bare necessity for a successful BI project. Thus, having accurate, complete, and effectively combined data sources is a must.
Google Analytics data is a fundamental source for reporting – and it’s available for free. In this blog, I’m going to show you how to pull data through Google API using CloverDX.
In the first section, we’ll talk about using Google’s authentication model. Most of it works universally for other Google services as well (though a few changes might be needed) so that you can keep it for future reference.
Then we’ll discuss the actual data pull from Google Analytics using the Google Analytics REST API.
Let’s get started.
In this example, we’ll use OAuth 2.0 for Devices. It’s one possible approach to using the authentication model. I’ve chosen this one because it’s designed for cases with limited user input capabilities. We need to automate as much as we can because transformations running on CloverDX Server are, in general, executed without any user interaction. First, visit Google Developers Console (https://console.developers.google.com/project) to register your project. Use the “Create project” button and fill out the information about your project.
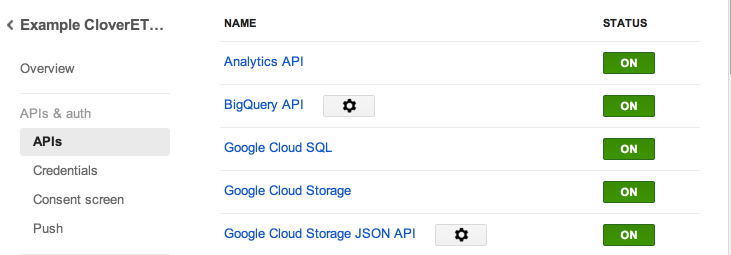
Then, go to the settings of your recently created project and enable Google Analytics API in APIs & auth -> APIs section.
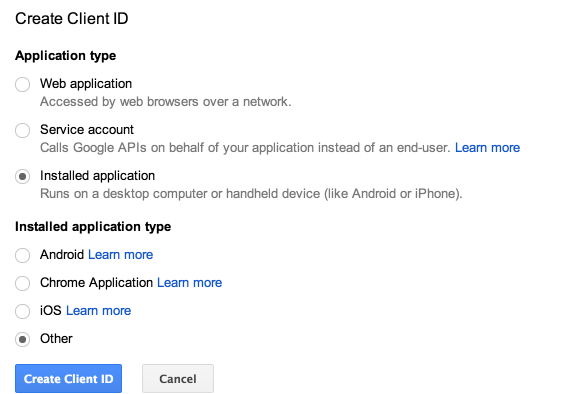
Next, go to the Credentials section. Use the “Create new Client ID” button and select “Installed application” and “Other” as application type.
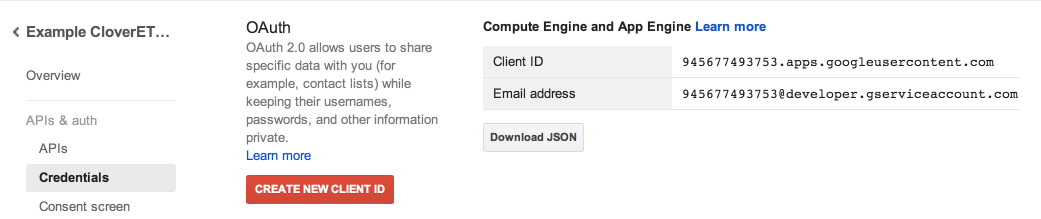
Once you complete these steps, a new Client ID will be generated for you and listed in the credentials section. You’ll use the Client ID and Client secret in CloverDX graphs.
Now that everything is set up on the Google side, let’s continue in CloverDX.
Get into it: Download the example now to follow along while you read - CloverDX GA Example Project Download
Now we need to generate an access token. As mentioned before, we’ll be using OAuth 2.0 for Devices. This means you will have to manually log into Google to authorize the app so that it can generate the access token.
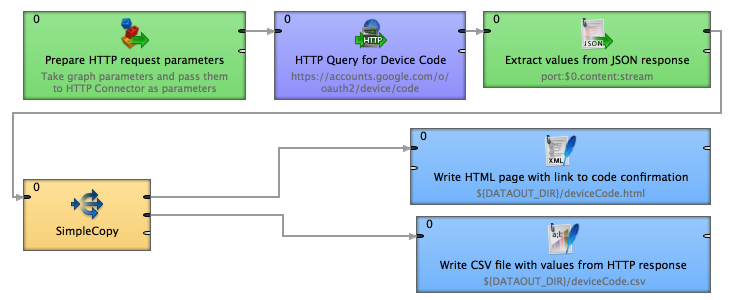
obtainDeviceCode.grf
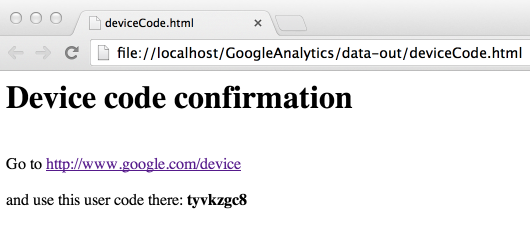
To do the prep work for you, there’s “obtainDeviceCode.grf” graph. It gets a device code and creates a simple HTML page that will get you to Google verification URL (http://www.google.com/device). Here, you’ll be able to create an access token for the follow-up transformations.
To make it work, just set CLIENT_ID in “credentials.prm” file to your Client ID from the previous step.
Once you execute the graph, open “data-out/deviceCode.html” page in your browser and follow the instructions.
Querying for the device code is done by an HTTP POST request to:
https://accounts.google.com/o/oauth2/device/codeAs a result, you receive a JSON containing device_code, user_code, and verification_url.
{

"device_code" : "4/783Z0eEv1BXgUMDevzhwcQntY5v1",

"user_code" : "8fj9iaih",

"verification_url" : "http://www.google.com/device",

"expires_in" : 1800,

"interval" : 5

}
The example graph stores these values into a CSV file just for reference and uses them to generate a simple HTML page with a link to the verification_url. All you have to do is open the generated deviceCode.html page and follow the instructions.
After submitting the user code, authorization is complete. From there, your new access token is ready to use. We’ll download it in the next step.
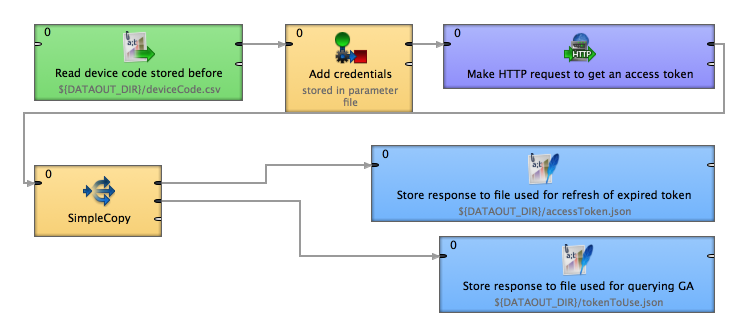
The next graph (obtainAccessToken.grf) shows how to get the access token. It reads the device code stored by the previous graph, gets the credentials from parameters, and fetches the access token into a JSON file.
obtainAccessToken.grf
To make it work, make sure you’ve successfully executed the previous steps and set CLIENT_ID and CLIENT_SECRET parameters in “credentials.prm” file.
The graph reads the deviceCode.csv and parameters to form an HTTP request to:
https://accounts.google.com/o/oauth2/tokenThe parameters used in this request are:
The response is a JSON, which looks like this:
{

"access_token" :

"ya39.5.AADtN_WleKhesKfX41hp9INV24BvLZuiNGX3xK5zeGO-MOCKDXlcTJ-61AfnTOKEN",

"token_type" : "Bearer",

"expires_in" : 3600,

"refresh_token" : "1/RTDyLNyLSLVbX5xiczLH4fxy34pEzUwIwM2rlqc4mSw"

}
We need two values – the access_token for querying GA reporting API and the refresh_token for refreshing access_token after it expires.
Now that we finally have an access token, we can proceed to actual Google Analytics data querying.
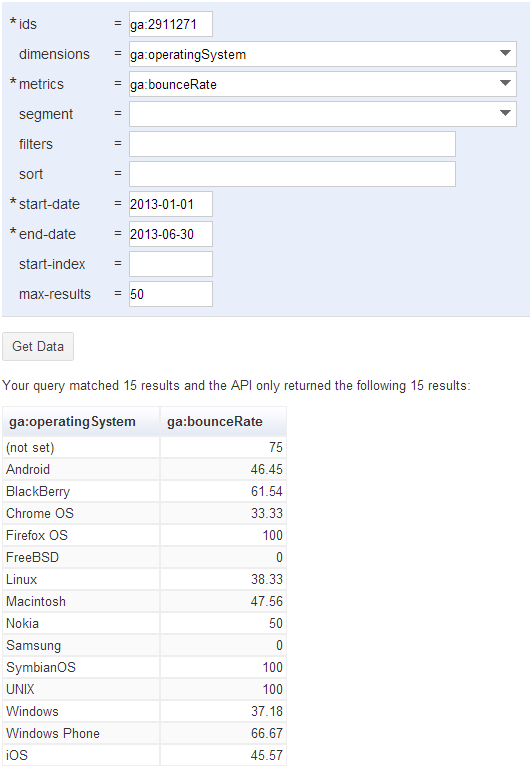
I recommend using the Google Analytics Query Explorer to build and test your queries and identify what parameters you want. In this example we’ll be pulling Bounce Rate data based on user’s OS.
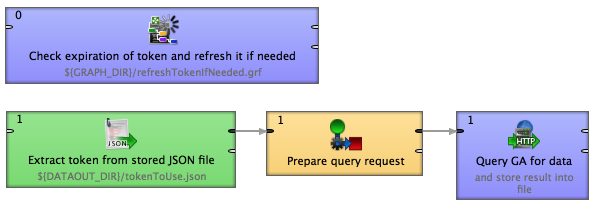
The following example (getGAdata.grf) shows one possible way to do so in CloverDX.
As you can see, the example graph is fairly simple. First, we refresh the access token if needed in phase 0 (I will explain this in more detail later) and then we prepare the request and fetch the data in phase 1.
Then, go to “GAparams.prm” file and set the values according to what you’ve built in the Query Explorer.
Once you execute the graph, the results will be stored as JSON in “data-out/ga_response.json”.
In the case of the Bounce Rate example, the output looks like this:
{

   "kind":"analytics#gaData",

   "id":"https://www.googleapis.com/analytics/v3/data/ga?ids=ga:2911271&dimensions=ga:operatingSystem&metrics=ga:bounceRate&start-date=2013-01-01&end-date=2013-06-30",

   "query":{

      "start-date":"2013-01-01",

      "end-date":"2013-06-30",

      "ids":"ga:2911271",

      "dimensions":"ga:operatingSystem",

      "metrics":[

         "ga:bounceRate"

      ],

      "start-index":1,

      "max-results":1000

   },

   "itemsPerPage":1000,

   "totalResults":15,

   "selfLink":"https://www.googleapis.com/analytics/v3/data/ga?ids=ga:2911271&dimensions=ga:operatingSystem&metrics=ga:bounceRate&start-date=2013-01-01&end-date=2013-06-30",

   "profileInfo":{

      "profileId":"2911271",

      "accountId":"XXXXXX",

      "webPropertyId":"UA-XXXXXX-1",

      "internalWebPropertyId":"XXXXXX",

      "profileName":"www.CloverDX.com",

      "tableId":"ga:2911271"

   },

   "containsSampledData":false,

   "columnHeaders":[

      {

         "name":"ga:operatingSystem",

         "columnType":"DIMENSION",

         "dataType":"STRING"

      },

      {

         "name":"ga:bounceRate",

         "columnType":"METRIC",

         "dataType":"PERCENT"

      }

   ],

   "totalsForAllResults":{

      "ga:bounceRate":"39.28580334654996"

   },

   "rows":[

      [

         "(not set)",

         "75.0"

      ],

      [

         "Android",

         "46.45161290322581"

      ],

      [

         "BlackBerry",

         "61.53846153846154"

      ],

      [

         "Chrome OS",

         "33.33333333333333"

      ],

      [

         "Firefox OS",

         "100.0"

      ],

      [

         "FreeBSD",

         "0.0"

      ],

      [

         "Linux",

         "38.333333333333336"

      ],

      [

         "Macintosh",

         "47.561990347811616"

      ],

      [

         "Nokia",

         "50.0"

      ],

      [

         "Samsung",

         "0.0"

      ],

      [

         "SymbianOS",

         "100.0"

      ],

      [

         "UNIX",

         "100.0"

      ],

      [

         "Windows",

         "37.179920275657054"

      ],

      [

         "Windows Phone",

         "66.66666666666666"

      ],

      [

         "iOS",

         "45.56962025316456"

      ]

   ]

}
That’s it!
In the “Prepare query request” component, there’s a little trick that’s used. Google Analytics API uses parameter names with a dash character (e.g. start-date,) but such names are not valid identifiers for CloverDX metadata field names. Because of this, we’re unable to pass query parameters directly to HTTPConnector as a record. So instead, we create the full request URL in a Reformat component and pass it to the HTTPConnector as one string. The Request URL in our case might look like this:
https://www.googleapis.com/analytics/v3/data/ga?access_token=ya39.5.AADtN_WleKhesKfX41hp9INV24BvLZuiNGX3xK5zeGO-MOCKDXlcTJ-61AfnTOKEN&ids=ga:11111111&dimensions=ga:date&metrics=ga:visitors&start-date=2014-01-01&end-date=2014-03-31The last part we’ll talk about is refreshing expired tokens. Access tokens are generated with a pretty short expiration (an hour). If the access token expires, you can use a “refresh token” to generate a new access token automatically, without having to go back to the user authorization page.
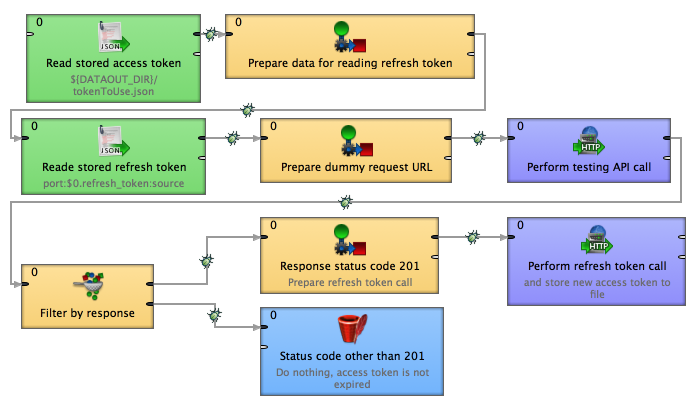
refreshTokenIfNeeded.grf
The graph reads the access token and the refresh token from JSON files. Tokens are kept in two separate files. The reason for this is that we overwrite the access token file every time we generate one, and we also need to keep the JSON with the refresh token for future use.
Then, we use a little trick to verify the token state. We perform a bogus request (notice “ga:123456” is just a dummy ID,) but we provide the access token to be verified. As the service verifies the access token first, we can tell whether it needs to be refreshed (status code 201) or not (any other code).
https://www.googleapis.com/analytics/v3/data/ga?access_token=ya39.5.AADtN_WleKhesKfX41hp9INV24BvLZuiNGX3xK5zeGO-MOCKDXlcTJ-61AfnTOKEN&ids=ga:123456The refresh request itself calls:
https://accounts.google.com/o/oauth2/tokenIt passes refresh_token, client_id, client_secret and grant_type parameters. The Grant_type parameter value is “refresh_token”.
A JSON response with a refreshed access token is stored into a file and gatGAData.grf graph takes it from there to use it in GA API calls. The response looks like this:
{

"access_token" : "ya39.5.AADtN_WleKhesKfX41hp9INV24BvLZuiNGX3xK5zeGO-MOCKDXlcTJ-61AfnTOKEN",

"token_type" : "Bearer",

"expires_in" : 3600

}